




How to grow marigolds in pots
Marigolds are cheerful, low-maintenance annuals that bring bright colour and natural pest protection to balconies, patios and rooftop gardens. Grown well in containers, they flower continuously from early summer until the first hard frost, and they help deter several insect pests, which makes them a favourite for both new and experienced gardeners. This guide sets out the best practices for success with marigolds in pots. For growing them in the ground, in beds and the vegetable garden, see the main guide on how to grow and care for marigolds.
Why grow marigolds in containers
- Continuous bloom with minimal care
- A natural deterrent effect on deer, rabbits and some soil nematodes
- Fast germination, which makes them an excellent starter plant for children and new gardeners
- Adaptable to almost any sunny outdoor space, including apartment balconies
Marigold types for pots
Three species dominate the seed racks, and picking the right one matches the plant to the pot rather than the other way around.
| Type and Latin name | Height (cm) | Bloom size (cm) | Minimum pot diameter (cm) | Best uses | Key notes |
| French marigold (T. patula) | 15 to 30 | 2.5 to 5 | 20 | edging, window boxes | Longest bloom season in wet summers |
| African marigold (T. erecta) | 60 to 120 | 7 to 12 | 30 to 45 | statement containers, cut flowers | Needs staking in windy spots |
| Signet marigold (T. tenuifolia) | 15 to 20 | under 2.5 | 15 | hanging baskets, herb pots | Edible, citrus-flavoured petals |
Containers and potting mix
Pot volume directly influences how the plant grows. Marigold root and shoot weight can increase by around 60% when moving from very small pots to moderately sized ones, so use a pot matched to your marigold type for the best health and flowering.
- 2 L pots, about 15 cm across, for dwarf French types
- 7 to 10 L pots, about 30 cm across, for full-size French or compact African types
- 15 L tubs or half-barrels, 45 cm or more across, for tall African types
Good drainage is non-negotiable. If your container has no drainage holes, drill four to six holes about 1 cm wide. Terracotta pots let air pass through their porous walls and reduce the risk of root rot, but they dry out faster and need watering more often. Plastic pots hold moisture longer but need more careful watering to avoid waterlogging.
A good potting mix for marigolds behaves like a well-drained garden loam while staying open as the roots fill the pot. A blend of 50% peat-free or coir-based potting mix, 25% composted pine bark or leaf mould for structure, and 25% perlite or coarse sand for drainage works well. Aim for a slightly acidic to neutral pH of 6.0 to 6.5, and if the mix is too acidic, a little dolomitic lime brings it back into range.
Sowing and transplanting marigolds
Starting seed indoors for early flowers
- Timing: sow 4 to 6 weeks before your last expected frost
- Temperature: germinate at 22 to 24°C for 4 to 5 days
- Depth: cover the seed with about 3 mm of vermiculite, since darkness is not essential but speeds sprouting
- Transplant: move into small pots when the true leaves appear, and grow on at 18 to 21°C in bright light
Direct sowing into pots
- Wait until night temperatures stay above 10°C
- Sow two seeds at each final position, then thin to the strongest seedling after 7 to 10 days
| Final plant height | Plants per 30 cm pot | Spacing, centre to centre (cm) |
| Up to 20 cm (signet, dwarf French) | 3 to 5 | 10 |
| 25 to 40 cm (medium French) | 2 to 3 | 15 |
| 45 to 75 cm (compact African) | 1 to 2 | 20 to 25 |
| Over 75 cm (tall African) | 1 | centre of the pot |
Light, water and feeding
Marigolds need at least six hours of direct sun a day to produce dense, colourful blooms. In partial shade they survive but grow more foliage at the expense of flowers, so rotate the containers weekly for even growth.
Water using a soak-and-dry method. Check the soil with a finger and water only when the top 2 cm feel dry, then water thoroughly until it drains freely from the holes and empty any water left in saucers to prevent root rot. In very hot weather, small pots and terracotta containers may need daily watering. Avoid overhead watering, which raises the risk of powdery mildew on the leaves.
For feeding, young seedlings benefit from a weekly dose of a soluble fertiliser with moderate nitrogen. After transplanting, switch to a balanced fertiliser every three to four weeks to keep the blooms coming, and top-dress monthly with a little compost for slow-release micronutrients. Avoid high-nitrogen lawn fertilisers, which push leafy growth and reduce flowering.
Routine care
Deadheading, the removal of spent flowers each week, redirects the plant's energy into new buds. Pinching just above the first full leaf below the flower head encourages bushier growth. For taller African marigolds, pinching the growing tips at about 15 cm encourages branching, and staking plants over 60 cm tall stops them falling over in wind or storms.
Pests such as spider mites and diseases such as powdery mildew can still appear. Hose off spider mites or use insecticidal soap as needed. Prevent powdery mildew by spacing plants well, watering the soil rather than the leaves, and removing infected foliage promptly. Root rot is avoidable with good drainage and by repotting into fresh mix if it sets in.
Seasonal care and saving seed
Early season
Harden off transplants over 5 to 7 days by placing them outdoors in dappled shade and increasing sun exposure daily.
Midsummer
- Deep-water containers before heatwaves
- Apply a 5 cm mulch of straw or husks on large tubs to slow evaporation
Autumn
Signet and French marigolds tolerate light frost, down to about -2°C, if kept dry. Move pots against a south-facing wall for an extra week or two of colour.
Saving seed and overwintering
Marigolds are open-pollinated unless labelled F1 hybrid. To save seed, let a few flower heads dry on the plant until papery and brown, crack them open and collect the needle-shaped seeds, then dry them for a week at room temperature and store them in a paper envelope inside a glass jar in the fridge. African and French marigolds are true annuals and will not overwinter outdoors except in frost-free climates, while signet marigolds are also annual but self-seed freely if pots are left in place.
Companion planting and ecological benefits
Marigolds earn their place in companion planting because they attract beneficial insects such as hoverflies and parasitic wasps that prey on common garden pests.
- Vegetable beds: interplant marigolds around tomato, pepper or aubergine containers to draw in hoverflies and parasitic wasps
- Herb planters: pair signet marigold with basil or thyme, since they share similar water needs
- Pollinator support: single-petal French cultivars offer accessible nectar for native bees, which supports a pollinator-friendly garden
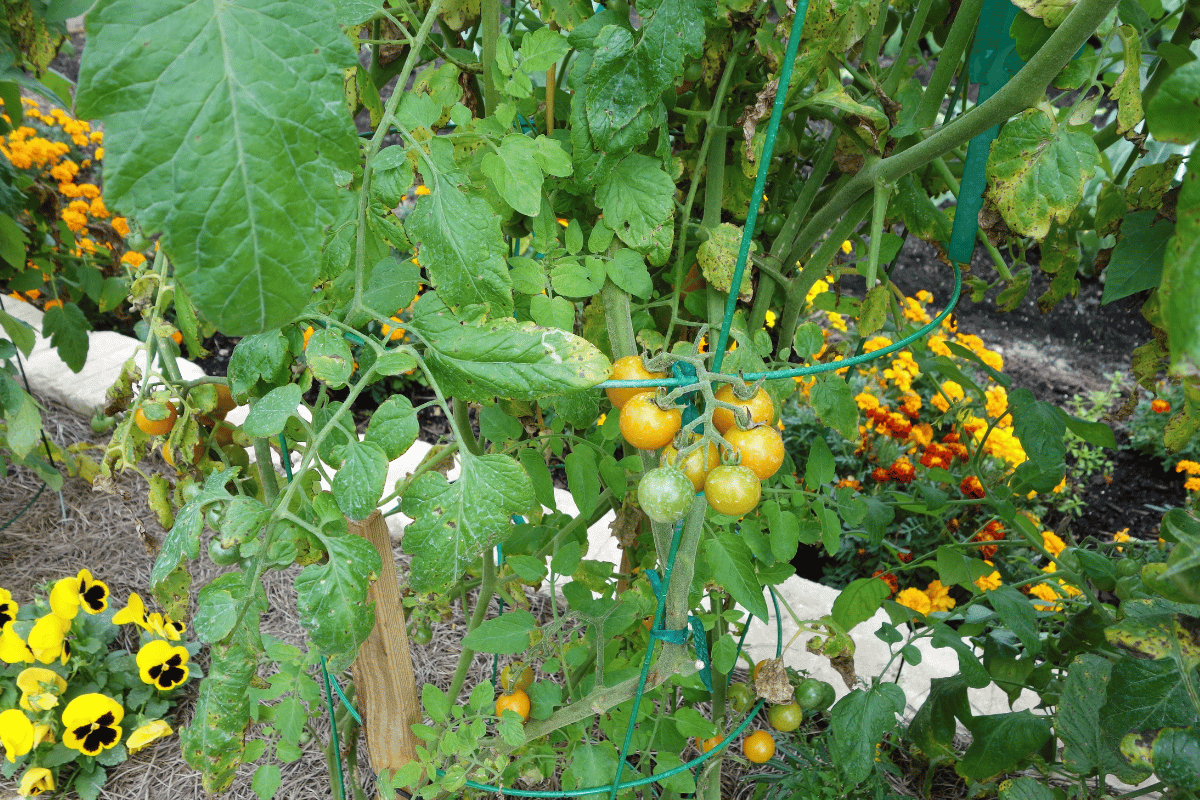
Tomatoes and marigolds are companion planting in a vegetable garden
Troubleshooting common issues
| Symptom | Probable cause | What to do |
| Lots of leaves, few flowers | Excess nitrogen or low light | Switch to a balanced fertiliser and move to full sun |
| Yellowing lower leaves | Chronic overwatering, poor drainage | Let the soil dry and repot with 25% sand or perlite |
| Leggy, floppy stems | Low light or overcrowding | Thin the plants, pinch the tips and provide support |
| Buds drop before opening | Sudden drought or root rot | Adopt a soak-and-dry schedule and check drainage |
Container marigolds reward even the busiest gardeners with colour right through the season when their basic needs are met, namely plenty of sun, a well-aerated potting mix, disciplined watering and light feeding. Whether you start from seed or buy young plants, choosing the right pot and mix sets you up for success.
For guidance specific to your area, particularly on fertiliser choice, pest management or the use of biological controls, it is best to consult a local agronomist or your nursery. For pest and disease control, try non-chemical methods first. When a product is needed, use only approved ones and follow the label instructions.
References
- University of Minnesota Extension. Growing marigolds.
- UC IPM. Marigold in the garden.
- University of Wisconsin Extension. Marigolds.