 Gaskiya")

Vertical farming key system types and common challenges for beginners
Farming faces big challenges today. By 2050, the world’s population could reach 9.7 billion, so we will need to grow much more food. (Affairs, 2019) Traditional farming methods are struggling to meet this demand.
We are losing good farmland due to poor soil and growing cities. Clean water is harder to find, and the weather is less predictable. These problems show we need new ways to grow food.
Vertical farming is one promising solution. This method grows crops upward instead of spreading them over large fields. Some think it is only for wealthy countries with modern buildings, but that is not true. Vertical farming can be simple, affordable, and useful for small farmers and city residents, especially in developing countries.
This article is for farmers, agricultural workers, and anyone interested in farming. It shares real-life experiences and lessons to explain how vertical farming works in a simple, clear way.
I started vertical farming before it became popular. In my third year at university, I experimented with any small space and materials I could find. Over time, I learned that vertical farming is not just a modern idea. It is a practical way for young people, students, and families with little land to grow fresh vegetables.
The historical evolution of vertical farming
Vertical farming might seem new, but the idea has been around for a long time. Ancient civilizations used terraced farming as an early way to grow crops in layers. The modern version became popular in 1999 when Dr. Dickson Despommier suggested that cities could grow food inside tall buildings to save land and improve food security. (Terrace (earthworks), 2024) Now, with more people, climate change, and expensive farmland, many are turning to this system.
What vertical farming is
Vertical farming is a system where crops grow in stacked layers, often inside buildings like skyscrapers, shipping containers, or old warehouses. What makes it different is that the plants do not touch the ground. Instead, they are held in a growing medium or a nutrient solution. (Vertical farming | Description, History, Aquaponics, Hydroponics, Crops, Pros & Cons, 2024)
In many vertical systems, soil is replaced or minimized. Roots still need support, which can come from coconut coir, perlite, gravel, or net cups. Nutrients are supplied through a liquid fertilizer solution. Switching from soil to liquid-based growing (hydroponics or aeroponics) allows tighter control of plant growth, but it also requires a better understanding of plant needs and system maintenance (Ferrarezi et al., 2024).
Why vertical farming can make sense
When I first tried vertical farming, the advantages were obvious:
- I could grow many plants in a small space.
- Production was no longer limited by land size.
- Startup costs were lower than I expected.
- It could work indoors or in small outdoor areas.
- It helped me grow even where local soil quality was poor.
Over time, I also saw how vertical farming can help young people without land start producing food right away.
Vertical farming system types
A practical way to understand vertical farming is to group systems into active and passive types. The main difference is how the nutrient solution moves.
- Active systems use pumps or electricity to circulate water and nutrients.
- Passive systems rely on gravity, capillary action (wicking), or a static reservoir without pumps.
Active systems
Active systems are common in commercial vertical farms because they deliver nutrients consistently and support higher planting density. They typically rely on pumps, timers, and recirculation (Wichitwechkarn & Fox, 2022).
Nutrient film technique (NFT)
- How it works: Plants sit in slightly sloped channels or tubes. A pump sends a thin film of nutrient solution through the channel. The solution flows over the roots and returns to a reservoir by gravity.
- Pros: Efficient oxygen exposure at the roots because the water layer is thin, steady nutrient supply.
- Cons: Power failures can be disastrous. If the pump stops, roots can dry out quickly. Channels can also clog when roots overgrow or debris builds up.
Drip systems
- How it works: A pump pushes nutrient solution through tubing. Drippers deliver solution to each plant’s base, usually through a growing medium such as coco coir. Excess solution can be collected and reused.
- Pros: Flexible, often suitable for larger plants, and generally stable when maintained.
- Cons: Drip emitters clog easily, and recirculating setups need regular cleaning and checks.
Passive systems
Passive systems do not use pumps, timers, or electricity to move water. They are often cheaper and better suited to beginners, small budgets, or places with unreliable power.
Wick system
- How it works: A nutrient reservoir sits below the plant container. A wick (cotton, nylon, or felt) connects the reservoir to the growing medium. Capillary action pulls solution upward, similar to how a paper towel draws up a spill (Wick System Hydroponics: Definition Pros and Cons, n.d.).
- Pros: No electricity, low cost, few parts to fail, quiet.
- Cons: Water and nutrients move slowly, so it is not ideal for heavy-feeding crops like tomatoes. Salts can build up in the medium over time.
The Kratky method
- How it works: Plants sit in a net cup with roots reaching into a nutrient solution. As the plant uses water, the level drops and creates an air gap. Upper roots access oxygen while lower roots absorb nutrients (Hydroponic systems, 2020).
- Pros: Simple and low maintenance, no electricity.
- Cons: The nutrient volume must be sized correctly to last until harvest. It often works best for leafy greens and herbs.
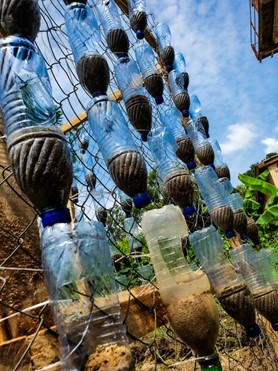
A low-cost vertical option: Recycled plastic bottle towers
One innovation I admire and have seen in practice here in Nigeria is the vertical system made from recycled plastic bottles. I am currently using this system successfully. Bottles are arranged on a strong vertical frame, filled with a growing medium, and planted. This method is cheap, reduces waste, and works even in small spaces.
What I have learned from bottle towers
- Bottles should be wide enough for root growth.
- The support frame should be strong and stable.
- Drainage holes are essential to prevent waterlogging.
- Plant placement matters. The whole structure should receive enough sunlight.
How the bottle tower works
In this system, bottles are stacked with the neck of one bottle fitting into the bottom of the next. A central wire or twine usually holds them together.
The Column: The bottles function as individual pots stacked in a column.
Anchorage: The bottles are filled with a lightweight substrate (anchorage) such as a mix of soil and compost, or purely hydroponic media like coconut coir or washed gravel.12 (Choosing the right substrate for your hydroponic system, 2024)
Nutrient Delivery: Water (mixed with nutrients) is poured into the top bottle.
Gravity Flow: The bottle caps are drilled with holes so water can drip from the top bottle to the one below, and so on, until it reaches a collection container at the bottom.29 This creates a chain reaction of watering. (Permagarden Technical Manual, n.d.)
Step-by-step bottle tower guide for beginners
Materials needed
- Plastic bottles (2-liter or similar), washed and labels removed
- Scissors or a box cutter
- Drill or heated nail (to make holes)
- Substrate (soil/compost mix or coir-based media)
- Rope or wire for hanging and support
Construction steps
1. Prepare the base bottle
Use one bottle as the bottom container. Cut the top off. Add drainage holes if it will hang, or keep it intact if it will serve as a catch basin.
2. Prepare the tower bottles
For the middle bottles:
-
Cut off the bottom.
-
Keep the cap on, then drill 1 to 2 small holes (around 1 mm) in the cap to slow the drip rate.
3. Cut the planting window
With the bottle inverted (cap down), cut a U-shaped or square opening on the side. This is where the plant will grow out.
4. Assemble the tower
Insert the cap end of one bottle into the open bottom of the bottle below it. The drilled cap should sit just above the growing medium in the lower bottle.
5. Secure the structure
Use wire or strong twine to hold the stack tightly and attach it to a wall, fence, or wooden frame (Wichitwechkarn & Fox, 2022). Stability matters more than height.
6. Fill and plant
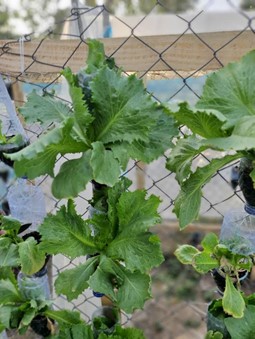
Fill each bottle with substrate. Plant seedlings such as lettuce, spinach, or herbs.
7. Irrigate
Pour water or nutrient solution into the top bottle and confirm that it trickles evenly down the whole tower.
Common challenges beginners face and how to solve them
Vertical farming is an exciting idea, but it has its challenges. Beginners may face problems that can be discouraging. Knowing about these issues ahead of time helps you stay prepared.
Algae growth
The problem
Clear bottles let sunlight reach wet roots and nutrient solution, which encourages algae growth (Satthong et al., 2019).
The solution
-
Paint bottles or wrap them with dark tape or fabric to block light.
-
If possible, use darker bottles (green or brown).
Temperature management
The problem
In hot climates, bottles in direct sun can heat up fast. Overheated roots reduce growth and can trigger wilting even when water is available. Root-zone temperatures above about 30°C can be damaging for many crops (Effects of High Root-Zone Temperature…, 2023).
The solution
-
Use shade netting or place the tower where it gets morning sun and lighter afternoon exposure.
-
Painting bottles white can reduce heat buildup by reflecting sunlight.
Nutrient deficiencies and pH imbalance
The problem
Bottle systems have a small volume of substrate, so plants can exhaust nutrients quickly (Carrasco et al., 2024). In liquid-fed systems, nutrients must be supplied consistently.
The solution
- Use a balanced liquid fertilizer or hydroponic nutrient mix.
- For low-cost organic approaches, compost tea or manure tea can work, but results vary and filtration is important to reduce clogging.
Water management
The problem
In stacked systems, top plants may receive too much water while lower ones may stay too wet or, in some setups, receive too little.
The solution
- Use a well-draining substrate. Mixing soil with sand, perlite, or coir usually drains better than dense garden soil. Compaction reduces oxygen at roots (Root growth and physiological responses…, 2023).
- Check the bottom level often. If it stays soggy, reduce volume or slow the pour rate. If it stays dry, water more slowly so each level has time to absorb.
Other beginner issues to watch
Growing medium mistakes
Dense soil compacts easily in bottles. A lighter, airy mix usually performs better.
Weak support structures
Most failures are physical, not biological. Strong supports prevent collapse during wind or heavy watering.
Insufficient sunlight
Leafy greens tolerate less light than fruiting crops. If light is limited, greens and herbs are usually the safer starting point.
Pests
Indoor does not mean pest-free. Aphids, whiteflies, and fungal issues can still appear, especially with poor airflow.
Nutrient mixing errors
Overfeeding can burn roots. Underfeeding stalls growth. Measuring and consistency matter.
Unrealistic expectations
Vertical systems can be productive, but they still require routine checks. The goal is fewer surprises, not zero work.
Conclusion
Vertical farming brings together old ideas and modern needs. It offers ways to grow food when land is limited, soil is poor, or weather is unreliable. From passive systems that use no electricity to recycled bottle towers already working in Nigeria, these methods can be accessible to many people.
For beginners, progress often starts small: one tower, a simple crop like leafy greens, and a willingness to learn what the plants are showing you.
Disclaimer: The construction methods and agricultural guidance in this article are based on research and general best practices. Local conditions vary. Testing materials and nutrient solutions on a small scale is recommended before expanding.
