
By Chloé Durot, revised by Clara Bosch
Are you interested in making your own vermicompost/ vermihumus? In this article, you can find the basic information to understand vermicompost and what you need to think about when making it. Such as the benefits of vermicompost, the differences with normal compost and the different technics you can follow to produce it, and how to choose your bedding and worms. Also, how to monitor the environmental conditions to ensure your worms will be happy.
We have a more practical guide on how to start the vermicompost pile, as done in La Junquera farm (Spain). Find more information here.
1. What is vermicompost?
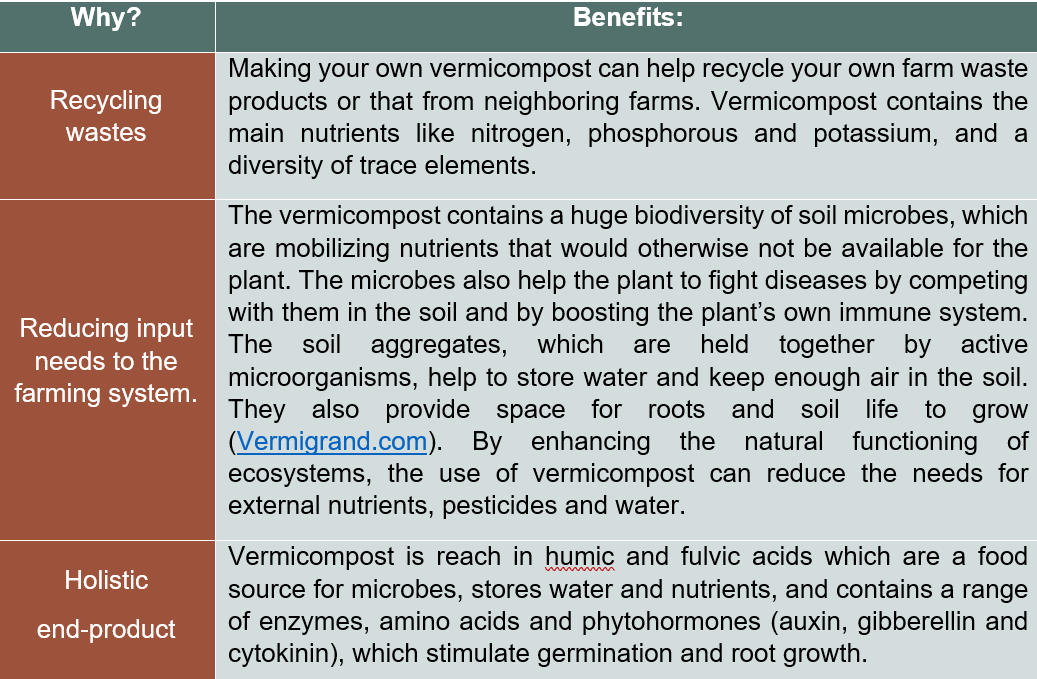
The use of vermicompost/vermihumus has been spreading over the last few years as it enables recycling waste and limits reliance on external inputs. The end product of vermicomposting (the vermicompost or vermicast/vermihumus) improves soil health and fertility, and nutrient availability. At the same time, it increases soil microbial life, improves soils' water retention capacity, and can reduce the need for chemical fertilizers and pesticides.
In short, Vermicomposting is the process of turning organic debris into worm castings. The emphasis is on processing the waste rather than creating ideal conditions for raising worms (agricultureinformation.com).
1.1. What are the benefits of vermicompost?
"On average, earthworm presence in agroecosystems leads to a 25% increase in crop yield and a 23% increase in aboveground biomass."
—Meta-analysis from University of Wageningen, Journal Nature
1.2. Why should I start vermicomposting instead of composting?
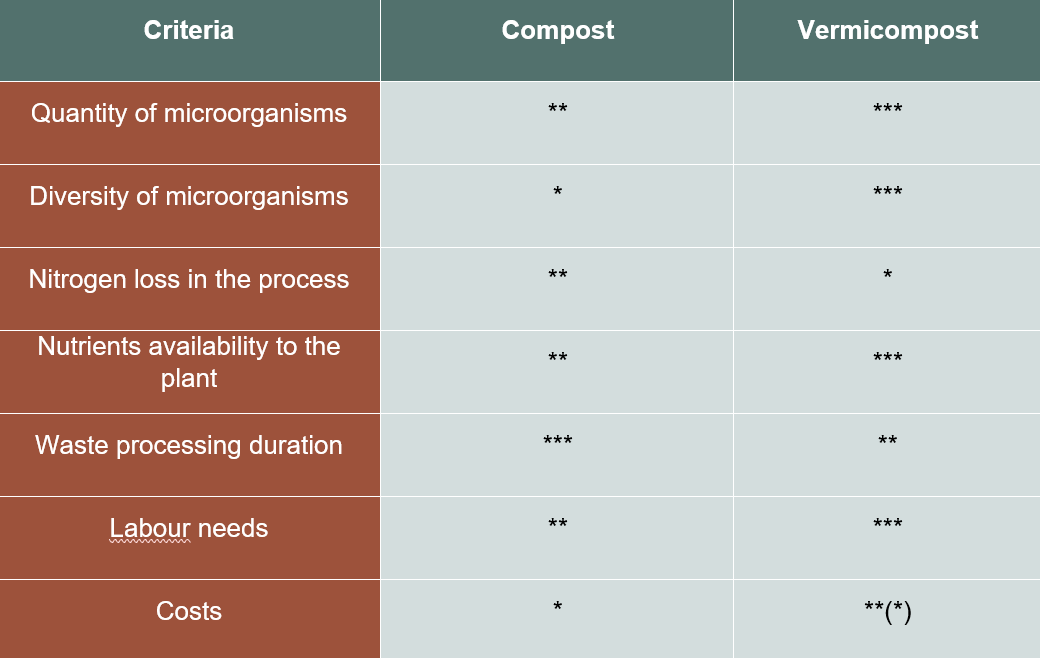
(* low, **medium, *** high)
Traditional composting depends on the favoring impact of the increase in temperature of a pile of organic wastes. During this process, specific bacteria come into action and decompose the organic matter. As the pile reaches temperatures above 60°C, many microorganisms, including pathogens, are destroyed during the process, as well as weed seeds. Vermicomposting can control the pathogen's development through higher competition between microorganisms. However, the presence of weed seeds can remain after the vermicomposting process. At the same time, the thermophilic compost piles release more nitrogen into the environment compare to the cooler process of vermicompost. Therefore, the nitrogen content in the soil is higher after vermicompost application than thermophilic compost. Next, compost is rich in ammonium, whereas vermicompost is high in nitrates, a more readily-available form of nitrogen. Also, the C/N ratio is lower in vermicompost, which makes the nutrients more available for the plants. Regarding the fabrication process, vermicompost can be done in half the time as thermophilic composting. After active decomposition, thermophilic compost needs to be matured for a couple of months or longer before it can be added to the soil as an amendrate. On the other hand, vermicompost can be used directly after harvest. Depending on the vermicomposting system and the environmental conditions, vermicompost production can last 10 days up to a year. The labor needs and costs vary highly depending on the type of system used. However, it is generally higher for vermicomposting than composting (i.e., setting up piles, feeding, and harvesting the vermicompost…).
2. How can I implement vermicomposting: which steps do I need?
This part lists the main factors to consider when implementing vermicomposting. The factors are divided into the following steps:
- Determine the goal you want to achieve with vermicomposting
- Decide on your vermi-system based on your goals, time, and material available
- Select the type of bedding you want to use
- Choose your worm species
- Select the type of materials to feed your worms.
Successful production of vermicompost needs time and practice, and the best way to find the most appropriate system comes from experimenting. It is essential to remind that establishing a vermicompost activity is always context-specific. For instance, some systems or worm species will be efficient in a particular environment and not well-adapted in another.
2.1. What earthworms should I choose?
Worldwide, there are more than 3,000 species, from the smallest, just a few centimeters long, to the largest earthworms in Australia, which are several meters long. They are divided into three groups depending on their habitats:
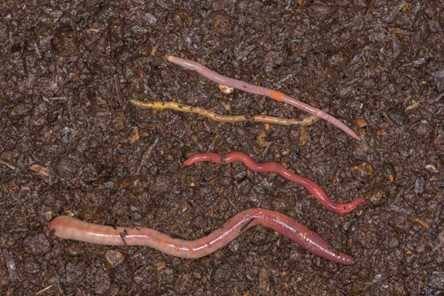
(Picture: vermigrand.com)
- Epigeic worms live in the organic layer on top of the mineral soil, like the litter layer you find in the woods.
- Aneic worms dig the soil vertically and bring organic materials into deeper layers, mixing soil layers and enhancing the soil structure.
- Endogeic group: living in the mineral soil, they dig more horizontally and have a large role in soil aeration through decompaction.
For vermicomposting purposes, only epigeic worms are used. Due to their highly efficient breeding and adaptability, Eisenia fetida is the most preferred worm species for vermicomposting. They can withstand large ranges of environmental conditions, such as temperature and pH. We can also find the Red Californian or Eisenia andrei as the most common earthworms used for vermicompost.A sustainable system starts with at least 1000 worms (or around 0.5kg) per square foot (0.09m2) surface area. This happens since the worms are top-feeders and mostly live in the top 10-15cm of the bin or pile. The calculations are always based on the surface rather than the overall volume.
2.2. What are the earthworm's characteristics and needs?
The worms are hermaphroditic and cold-blooded. Meaning that they cannot regulate their temperature; hence they assume the same temperature as their environment. They do not have lungs and breathe through their skin, making them susceptible to dying if their skin dries out. In practice, this means that worms need constant moisture conditions. Moreover, worms are light sensitive: exposure to bright light paralyzes them within about 1h, and they may die from the drought of their skin. Blue light repels them while they are insensitive to red light (ideal to observe them without disturbing them).
2.3. What are the perfect environmental conditions to have my worms happy? How can I monitor these conditions?
When starting a vermicompost system, the monitoring should be done daily to be rapid enough to change conditions if something is wrong. We usually count five parameters to monitor carefully. The following table gathers the main information related to these parameters and some tips.
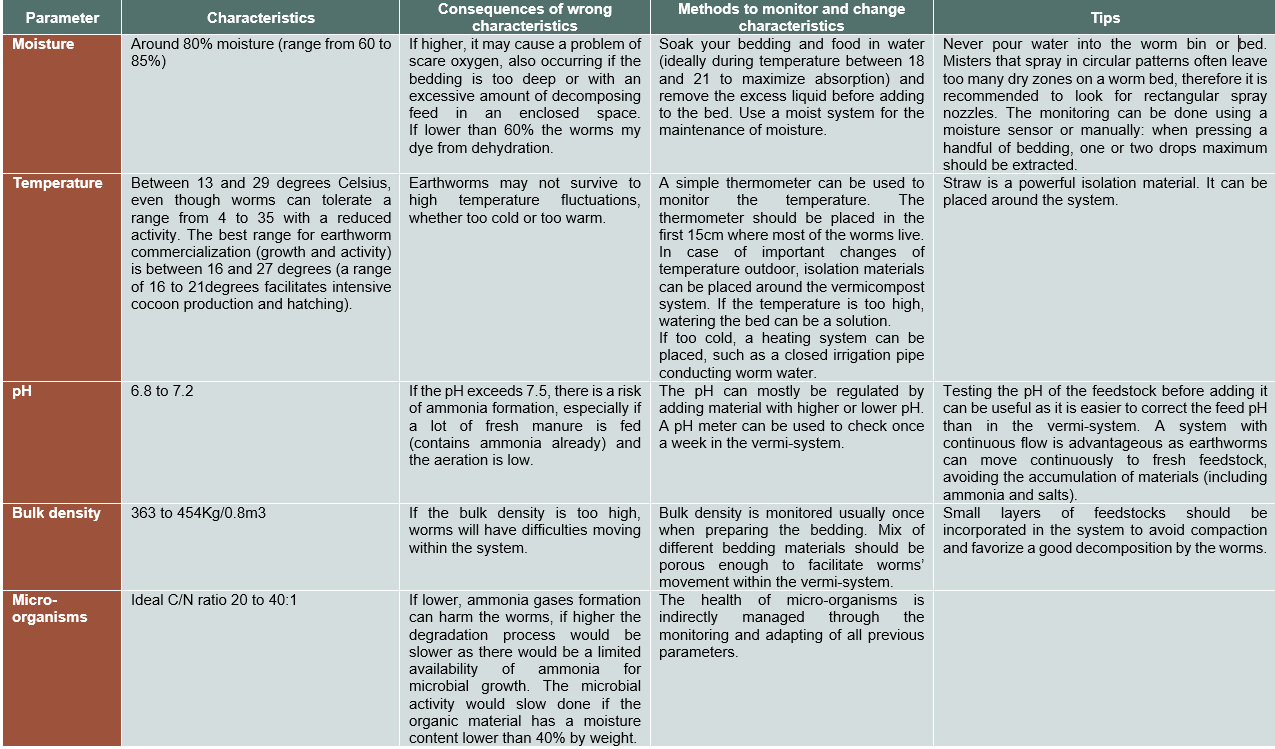
As a general rule, if the worms are found in the lower parts of the bin, the environmental conditions of the first layers may be inadequate for the worms. This is an easy way to verify whether the provided environment suits the earthworms.
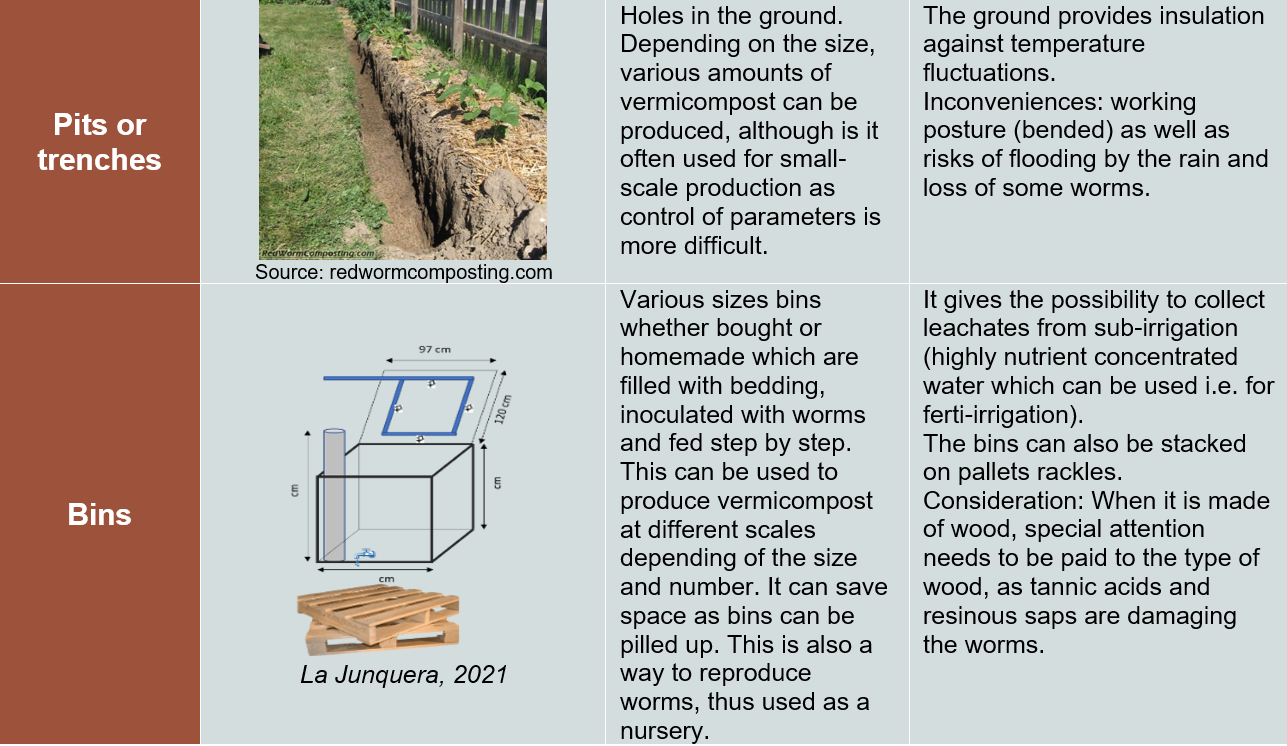
3. What are the types of vermi-systems, and how to choose?
The choice of vermi-system is primarily based on the production objectives: large-scale production vs. small-scale, worm nursery to sell worms vs. harvesting vermicompost, targeted time to harvest, etc. Then, the material availability, workforce, and environmental conditions need to be considered, such as choosing the most adapted system to the needs.
The various existing systems can be gathered into two main groups:
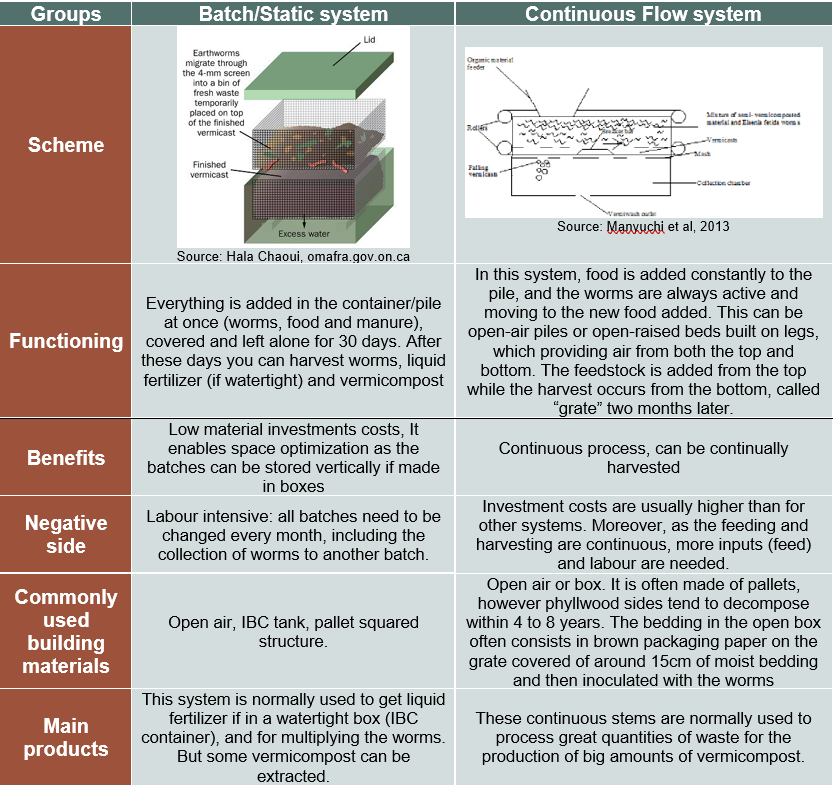
3.1. Common vermi-systems: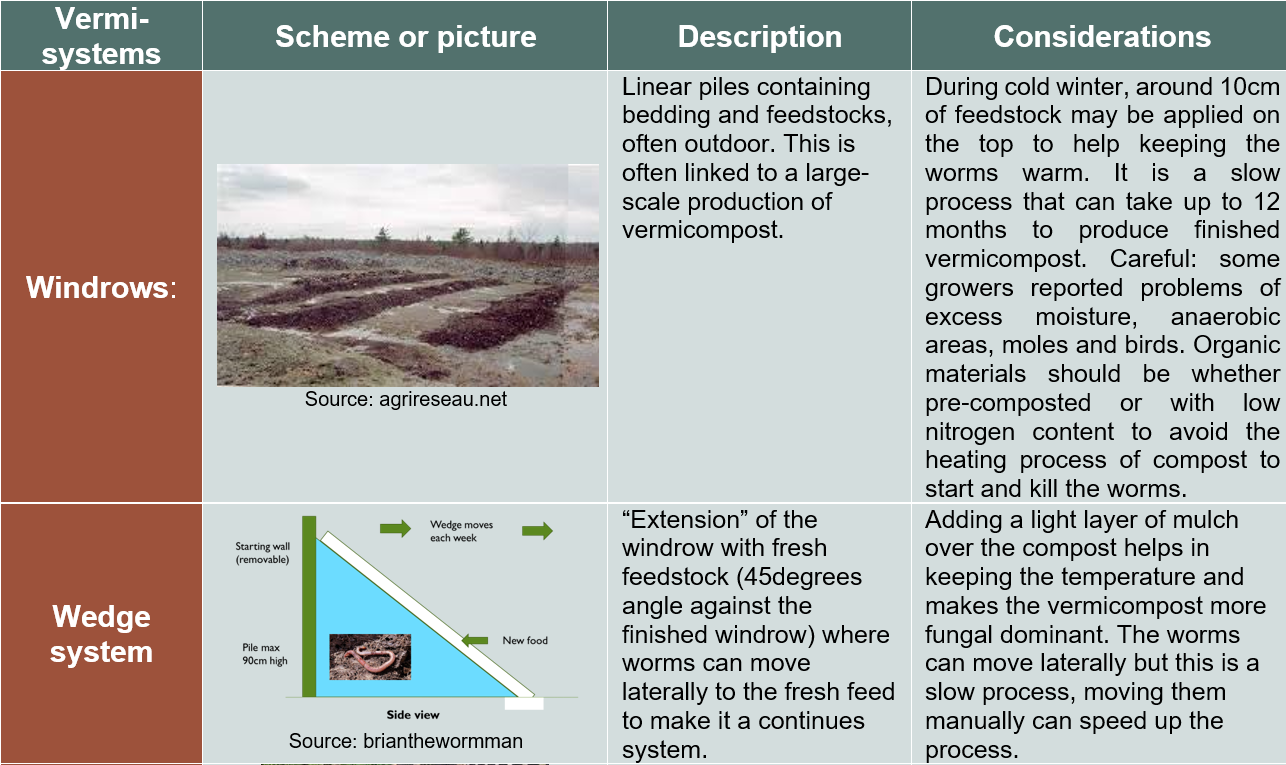
4. Which bedding should I choose?
The bedding is the material layer where the worms live in. On top, you will add the new fresh food, the feedstock, which sometimes needs to be mixed with the bedding materials. The main role of bedding is to provide worms with shelter in case of temperature fluctuations and inappropriate feeding.
The four main requirements for an appropriate choice of bedding are:
- Its ability to keep moisture
- Its low content of proteins and low level of organic nitrogen that would quickly decompose and may turn into ammonia. If the bedding is not decomposed enough or contains a lot of readily degradable carbohydrates, it could heat up and kill the worms.
- Loose in texture to facilitate worm’s movement. Also, too much mass of bedding can provide the opportunity for bedding to heat up, especially when consisting of many not yet decomposed materials.
- Porous to enable oxygen.
Bedding may be sand, wood shavings, sawdust, paper, compost, hay, wood chips, straw, peanut hulls, corn stubble, cardboard, tobacco stems, or other industry by-products. It is best to mix different materials for the bedding since every material has different properties.
Some recommended materials would be horse manure at least 3 months aged, shredded cartons, aged leaf mold, and shredded brown leaves. Have a look at the case study of La Junquera (see Additional resources) to better understand what the bedding could look like.
5. Which feedstock should I use, and how much? What are the required characteristics?
You can choose different waste streams to feed your worms, such as crop residues and matured manures. The main impacting factors of worm-feed characteristics are the size of its particles (i.e., straw has a bigger size than lettuce), its homogeneity, C/N ratio, and content of residues, pathogens, and seeds (i.e., weeds). Next to this, you can consider pre-composting the feed. See the benefits below.
The C/N ratio from feedstock ideally ranges between 25:1 to 35:1. Organic material will break down more quickly in the worm bed if they consist of simple sugars, have high microbial activity, or are tiny particles that can be sucked in by the worms directly. For example, if one input would be pruning wastes, it should be shredded into tiny particles and combined with green materials.
The amount of food layer is crucial due to the risk of overfeeding and overheating. Lower layers can become anaerobic (without air) as worms will constantly move on top to find fresh, available food. The advised thickness of the food layer added in the vermi-system is usually between 2.5 and 3.8cm. When using raw food scraps, keeping the bin of pile covered is needed to avoid flies, gnats, birds, etc.
For vegetables or fruit-based feedstock, earthworms would consume 50 to 100% of their body weight per day (depending on the environmental conditions such as temperature, moisture, etc.) as that material usually contain a high-water content, thus less food value. For manure, the feeding rate is usually around 25 to 35% of their body weight per day. It is better to frequently apply a small layer (up to 5cm high) of feed.
Benefits of pre-composting the feedstock:
- Chemical: lowering ammonia levels, potential decomposing toxins, moderating pH levels, lowering the oxygen demand
- Physical: reducing the weight and volume, making the worm feed homogeneous, reducing the risk of heating the feedstock, reducing potential odors
- Biological: killing the pathogens and reducing vectors' attraction, destroying weeds and seeds, favoring the abundance of microbial activity.
6. Conclusion
Vermicomposting with earthworms is a promising solution to increase farm circularity, reduce wastes and improve soil fertility and crop resistance. Diverse systems exist for various applications: from small-scale home-garden production to large-scale business models for international export. The choice of vermi-system, worm species, bedding, and feedstock is based on the production objectives and socio-economic and environmental context. Finally, no model can be identically replicated: vermicomposting is about trying, experimenting, and improving until a successful system is obtained.
Additional resources
Literature:
- S. Shutenko, W.S. Andriuzzi, J. Dyckmans, Y. Luo, T.L. Wilkinson, O. Schmidt. (2022) Rapid transfer of C and N excreted by decomposer soil animals to plants and above-ground herbivores. Soil Biol. Biochem., Article 108582, https://doi.org/10.1016/j.soilbio.2022.108582
- Eisenhauer N. and Eisenhauer E. (2020). The “Intestines of the Soil”: The Taxonomic and Functional Diversity of Earthworms – A Review for Young Ecologists. DOI : https://doi.org/10.32942/osf.io/tfm5y
- van Groenigen, J., Lubbers, I., Vos, H. et al. Earthworms increase plant production: a meta-analysis. Sci Rep 4, 6365 (2014). https://doi.org/10.1038/srep06365
- Munroe, G. (2007) Manual of on-farm vermicomposting and vermiculture. Organic Agriculture Centre of Canada, Nova Scotia Manual of on-farm vermicomposting and vermiculture
- Brian “The Worm Man” Donaldson. The Wedge Vermicomposting System - A Large System For Serious Or Commercial Farmers
- Manyuchi M. M., Phiri A., Muredzi P., Chirinda N., 2013 Bioconversion of food wastes into vermicompost and vermiwash. International Journal of Science and Modern Engineering 1:1-2.
Webography:
- Vermicompost at home: https://www.wormup.ch/home-anleitung
- https://www.vermigrand.com/en/biohumus
- https://www.agricultureinformation.com/forums/threads/vermicomposting.133634
- https://www.ucd.ie/newsandopinion/
- The Vermicomposting Trench - Red Worm Composting com
- Article “Vermicompost: How it was applied in La Junquera”


