Vermicompost: How it is applied in La Junquera
This post is also available in:
This post is also available in:
![]() Ελληνικά (Greek)
Ελληνικά (Greek)
By Clara Bosch, Chloé Durot, & Luis Leblanc , Autumn 2022.
Are you curious about finding out how vermicomposting can be applied? Below you can find all the information concerning the vermicompost project in La Junquera, Spain.
We started a year ago by caring for our worms. The initial setup is explained in this article. The main goal of this initial setup was to learn how to reproduce the worms and discover if they would keep active in the environment and the characteristics of our farm. The short-term idea is to use the farm and village’s wastes, such as manure, organic wastes from households, and winery by-products, to generate a beneficial organic material for soil fertilization. In the long run, we would also like to include the use of the composted pig slurry of a neighboring farm and convert it into something healthy and usable (since this is a big problem in Spain).
Currently, we are working on changing the current batch system into an open-air windrow system. If you are looking for an article explaining all the different types of vermicompost and how to monitor it, check this technical article: here.
In this article, you can find a step-by-step explanation of all the materials we used and our monitoring system in this first year. At the end of the article, we share current insights and recommendations for if you would like to implement a vermicompost project. Finally, there is a bit more info about our scaling-up ideas.
INFOBOX, La Junquera
|
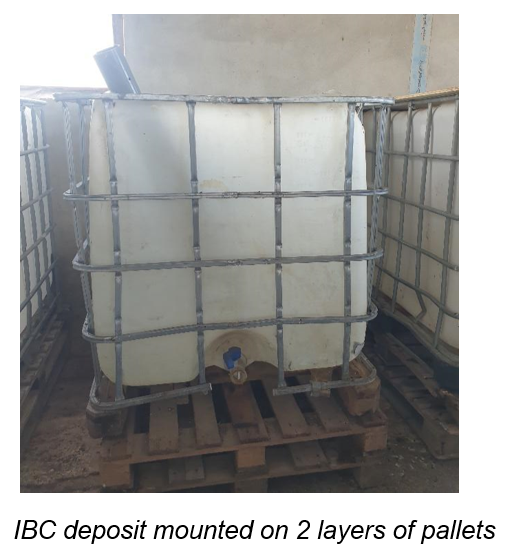
1. Installation
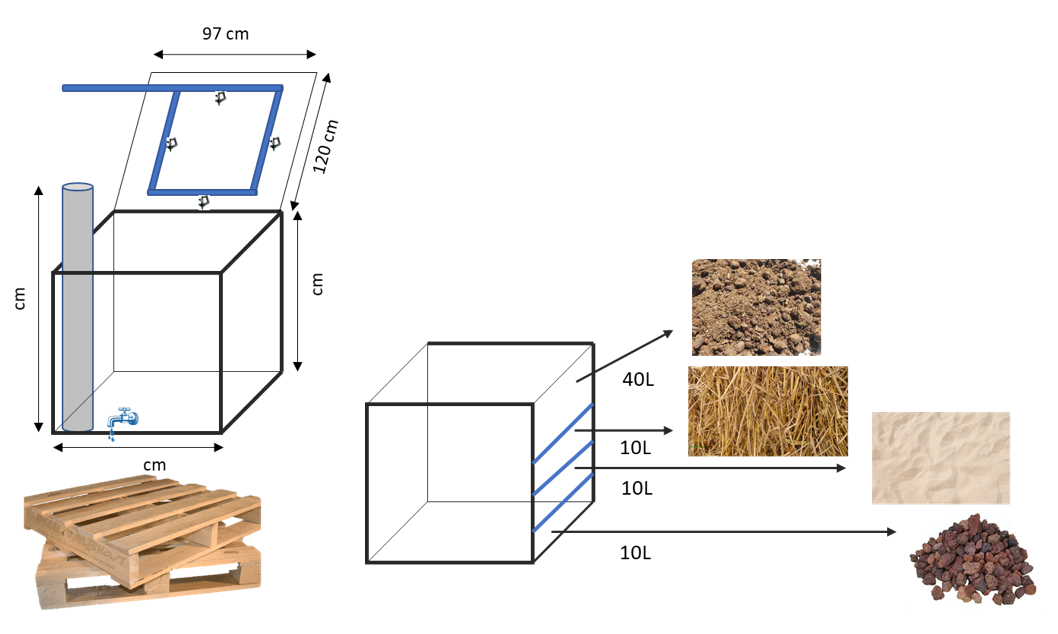
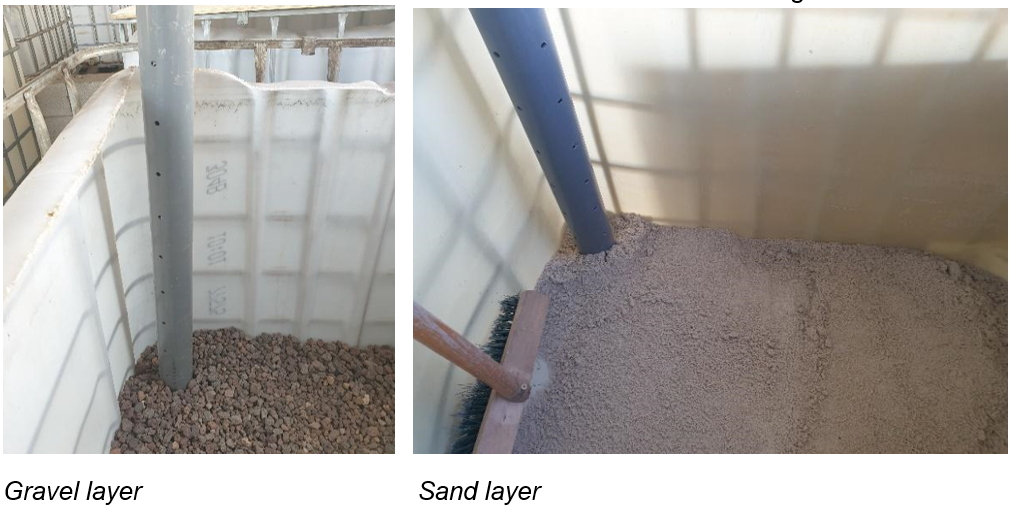
Dimensions and materials used in our initial vermicompost installation. Consisting of an IBC container standing on two pallets, a lid where an irrigation system was installed, and the initial liters of bedding used; gravel, sand, straw and manure; from bottom up. The liters displayed should be multiplied x10.
1.1 Material
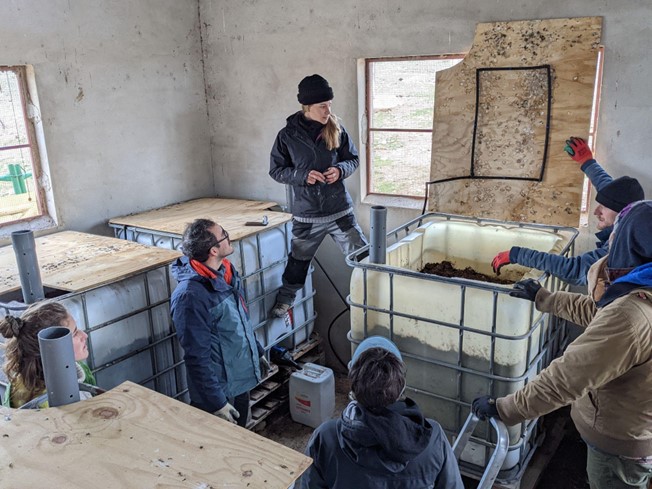
A total of 10 IBC containers were installed in the cow barn mounted on 2 pallets to access the bottom taps. The containers aim to nurse worms and boost their reproduction, enabling future scaling-up of the project. A PVC pipe with holes was installed to provide aeration throughout the container
.
1.2 Bedding Confection
The bedding consisted of four different layers; gravel, sand, straw, and composted manure. The first layer in the container consisted of gravel (10 cm). The gravel is not in contact with the worms but is used as a filter to keep the area oxygenated and favor the development of bacteria. Then sand (10 cm) was used to separate the gravels from the straw and provide a more effective filtration. The straw (10 cm) is used as bedding for the worms. It also gives a large quantity of carbon and can be used as a shelter for the worms if the manure contains too much nitrogen.
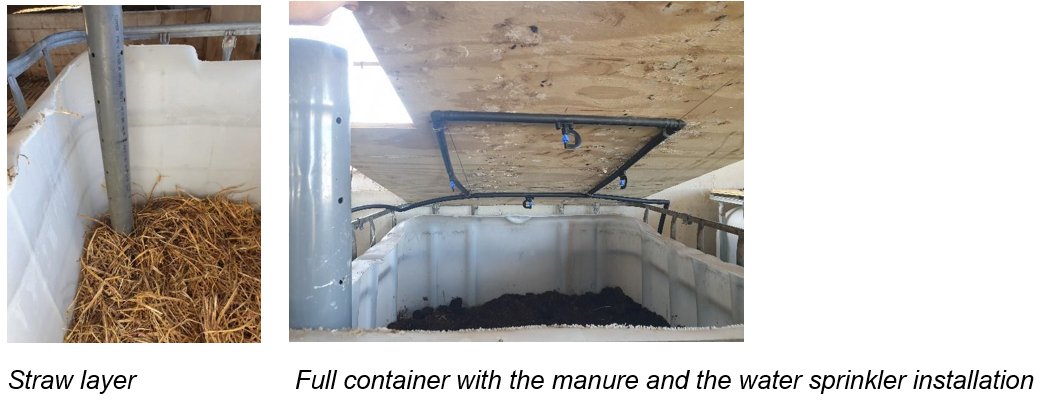
As the last step for bedding preparation, a top thick layer (400L or 40cm layer) of manure was applied in each deposit. Five deposits had around 20% horse manure (around 3 months old), 40% cow manure, and 40% sheep manure. The other five had approximately 45% cow manure, 45% sheep manure, and 10% horse manure. Finally, lids were placed to cover each deposit, adding extra insulation and protection from the birds (from feeding on the worms or bringing an uncontrolled amount of nitrogen). The irrigation system, consisting of 4 rotative sprinklers per deposit, was fixed on the lid and turned manually once a week to maintain constant moisture in the worm beds.
After some time, we added an extra layer of straw to isolate the container and a net to protect the entrance of rats. 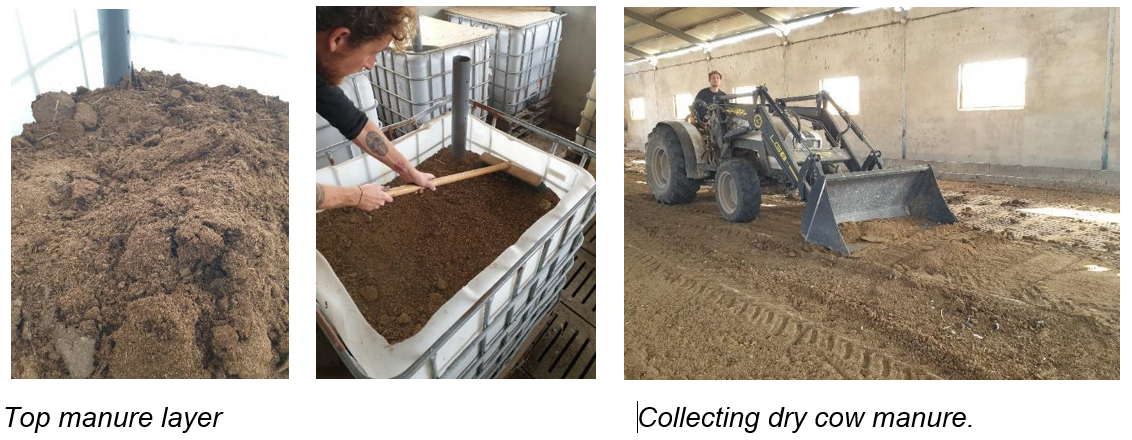
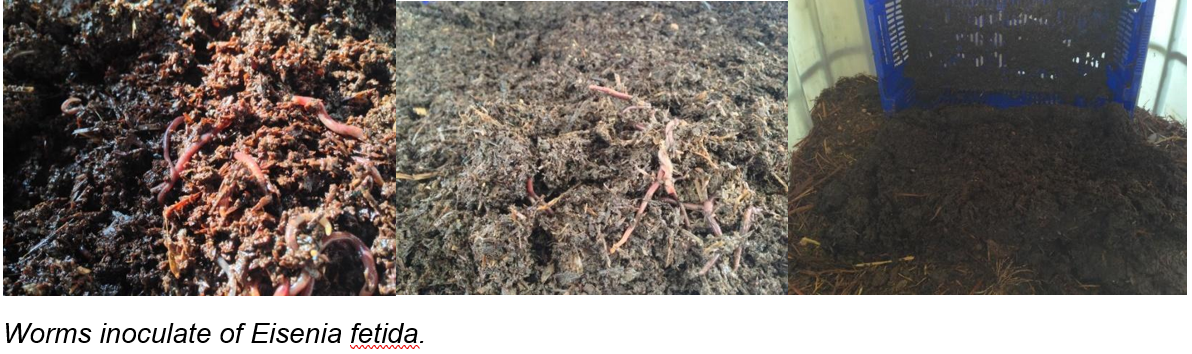
1.3. Worms inoculation
One box of approximately 1000 worms was incorporated into each deposit in the last week of October 2021. The worms we used were Eisenia fetida. After a month of shaping and organizing themselves, the adult worms start producing offspring. Three months later, offspring become adults and begin laying eggs too. The activity slows down during winter and should pick up again around April. In our case, we didn’t see a complete pause in the process, even during the cold winter months.
2. Monitoring and feedstock
2.1 Feeding the worms
Feeding the worms involves applying a layer of approximately 5 cm of food per deposit. The feedstocks used were the followings:
- Crushed raw fruits and vegetable residues from the houses on the farm mixed.
- Compost of grape pomace and horse manure
- Raw leftovers from grape and apple processing.
- Coffee grounds in small layers to feed the immature worms as they move easier in this type of material.
- Manure from cows, sheep, and horses.
- Leftovers from the vegetable garden.
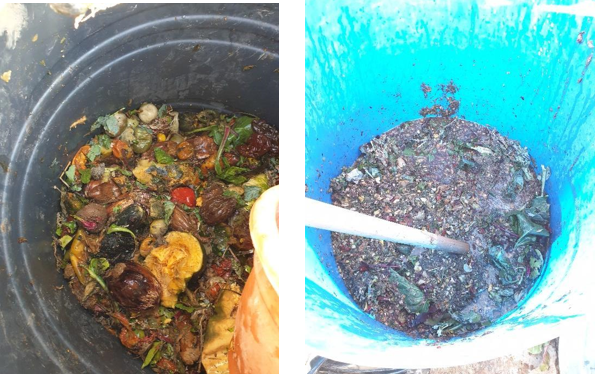
Vegetable residues from the village. Vegetables are shredded, ready to be fed to the worms.
The feedstocks were used when available. Feeding happened at approximately 2 weeks of intervals. Ideally, feeding should occur every 7 to 10 days, but we always check if the worms have consumed all the food first. After feeding vegetables, we always covered them with manure.
We fed the worms for 10 months. After that, we stopped feeding and irrigated for around 8 months. Currently, the batches are fully composted and ready to harvest the worms to inoculate in the new windrow system. The worms will be collected using a sift to have the humus separated from the worms, or a second option will be putting the batches next to the windrow piles so that the worms will move by themself to these new piles.
The harvested humus will be applied in the next pistachio plantation, a test of 1 hectare, considering 3 kg per tree in the same way that vermicompost tea will be made to test its effect on almond, pistachio trees and cereal in the following campaign. Other ideas are to impregnate the cereal seeds (seed coating) with vermicompost tea to give them beneficial microorganisms to help establish the seedling.
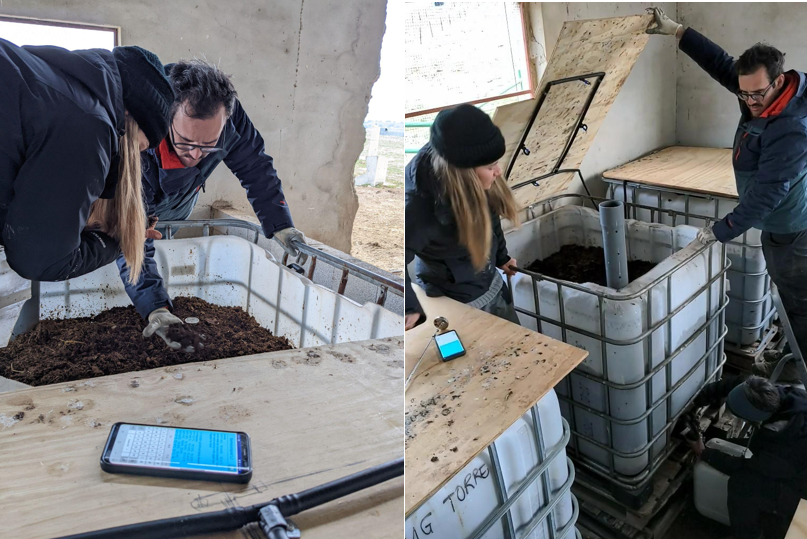
2.2 Monitoring the deposits
The temperature in each deposit is monitored with a compost thermometer every week at around 20 cm deep just before irrigation. A graphic is then updated, showing each deposit’s temperature evolution in time. You can see the graph at the end of the article. The moisture of the bedding is checked every week to maintain an ideal level of 60 to 80% of moisture. We checked the moisture manually while pressing a handful of bedding; no more than one or two drops should drip. Then, short weekly irrigation was provided to the deposits for a duration varying from 3 to 6 minutes. After this irrigation, the leachates were collected directly into buckets with the help of funnels or kept in the deposit for a week to provide enough time for the water to percolate and be collected directly later. The collected leachates are stored in another IBC container and thought to be used at some point for irrigation when the content of humic and fulvic acids becomes optimal or for other purposes (i.e., direct fertilization, anaerobic compost dilution…etc.). We have come to the realization that ideally, there should not be leachates, and also that these leachates are very complicated to use correctly.
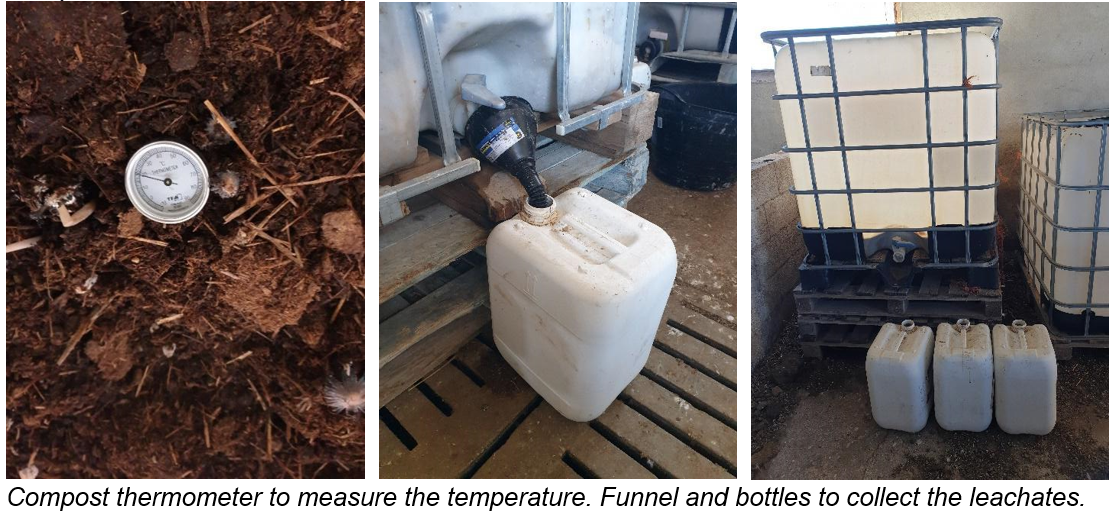
Weekly monitoring of temperature, moisture, and worm status.
3. Learnings and reflection on the current system
General conclusions:
- The worms could survive our conditions! Even in the coldest months, when the temperature dropped to 5°C inside the beds and to 0°C outside the beds, the worms stayed mildly active
- Only one batch heated up due to a thermophilic process happening. This was maybe an addition of too much fresh horse manure. Although this turned out to work to our benefit, given the cold temperatures.
- The sprinkles we installed got clogged with time, meaning we had to irrigate by hand. Installing a good irrigation system will pay off in the long term.
- Finally, from the pilot project, it was expected to harvest about 5 tons of earthworm humus by the end of October, although we believe that these times could be shortened, and it could have been harvested in August. After the harvest, we got a yield between 250 and 300 Kg from each container, hence a total of 2 to 3 tons of humus or vermicast.
Batch system improvements:
- In general, we concluded that plastic IBC deposits are not ideal since they do not provide proper aeration. We used this to collect the leachates, but a well-managed system should not have leachates since this means an excess of water. And an excess of water again means anaerobic places and washing of the nutrients from the pile. The worms and the microorganisms that you want to promote, need an aerobic environment.
- We would therefore recommend a more open container that allows for aeration from any side of the bin.
- Automated irrigation would be a plus; we spent a lot of time watering the system.
- Having the worm beds raised made it difficult to access the batch for routine checks and harvesting.
- How bigger the pile/bach, the inside of the pile of the batch will keep a more stable temperature where worms can shelter during extreme conditions. Therefore we are going to make these larger open-aerated windrows in the coming project.
Feeding:
- Food for worms needs to be humid, as the environment, they live in, ideally 60% to 80%.
- Before feeding, control the humidity of your feed and pile; you don’t want to add excess water. If your feed is above the ideal humidity, don’t water the pile that day. If the feed you have available is completely dry, try adding some extra water after feeding, making it a comfortable environment for your worms to move to.
- Pre-composting the material before feeding the worms is recommended; this would be the perfect food for them; by doing so, you ensure the batches will never go into thermophilic processes that would kill the worms. Thermophilic compost also helps kill pathogens and weed seeds, creating a final clean product.
- To activate the worms when it is seen that their activity has decreased a little, it is recommended to give fresh products, vegetable leftovers, or manure in small layers on top of the piles to diversify their diet.
- Have a stable feeding schedule even if you don’t have the ideal feed.
- Feed small layers (5 cm max) to avoid fresh food or manure going into the thermophilic phase and killing your worms.
Other tips:
- Mount the system in a place where you have access to water and electricity. Access to electricity would be a good asset, such as for using a pump (automatic irrigation) or light (visual monitoring in wintertime)
- The place should also be easily accessible by vehicles of all kinds. (so you can move the baches easily with a tractor, for example)
- Mounting the system in a covered place is important for preventing the batches from drying out in our conditions.
- If you are on your own and don’t have an automated system, consider that feeding and watering the worms is quite time-consuming.
- Even though we saw that they could survive low temperatures, mulching and having a heating system (warm water pipes) to keep the superficial layer above 10 degrees helps keep the worms more active.
4. Scaling up of the project
One of the objectives was to increase the earthworm populations to further scale up the project without paying for more worms. We want to scale up, but in two phases. We will first explain the short-term plans and then the long-term ideas.
4.1 Short-term scaling-up plan
We want to pre compost the materials before feeding the worms. By the beginning of 2023, we intend to build a composting area with access to water and electricity and a concrete floor. This area should also have a roof, which will help with two factors: to collect rainwater, reduce our water consumption, and secondly, reduce water losses caused by direct exposure to the sun and wind of the compost piles—obtaining an area that would comply with the composting regulations and where it would be possible to work more efficiently with the tractor.
The material to compost would be:
- Manure from:
○ 6 horses (54 tons/year)
○ Summer and autumn sheep (30 tons/year)
- Organic wastes from the orchard and the village (not yet quantified)
The compost piles will be on 25 cm beds of straw, 3 meters wide by 15 meters long by 1.5 meters high; this will be reduced to about a third of the height. Setting up a drip and sprinkler irrigation to have a greater capacity to maintain the humidity of the piles considering that the manure used to create them has already spent some time drying and takes time to pick up moisture.
After approximately 60 days of pre-composting and making sure with a composting thermometer that temperatures do not exceed 30 degrees, we will introduce Eisenia fetida earthworms in the pre-composted piles to improve the quality of the final product through vermicomposting, improving the structure and the number of beneficial microorganisms.
The care that must be taken in a pile is a little less intensive in terms of time compared to the pilot containers since the volume of the pile helps to self-regulate the system; it is only essential to monitor the temperature in the first two months of production of the compost. Then check the weekly moisture content and the general appearance of the worms.
After 3 to 6 months, the humus from that pile will be harvested and used.
Approximately every 4 months, the population of worms doubles. As a result, it is necessary to inoculate the pile with worms 2 months after. A new pile is started with fresh organic matter to begin with its thermophilic phase, and so after, it can be inoculated with the worms.
The following three investments should be considered to do this phase:
- Concrete floor for composting management to prevent leachate from leaking into the soil and to comply with regulations. Considering the square meter of reinforced concrete floor at 18 euros (quoted with a supplier in the area), an investment of 8,000 euros should be made.
- Water and electricity points close to the composting site.
- Water pump and irrigation system
- Rooftop for the area.
All this is considering that we already have a tractor and a compost turner.
4.2 Long-term scaling-up plan
With the long-term proposal, we want to apply for European funding. The idea is to create a scalable modular system according to the availability of resources and investments of each farm (or farm community). With this, we could process an abundant source of organic matter, such as pig slurry, while cleaning and creating a great fertilizer. This is very important as, pig slurry is one of the biggest contaminating issues in Spain. The negative environmental and social impact of directly pouring the slurry into the fields can be therefore reduced by fertilizing with a product that helps regenerate the soil.
For the pre-composting part, the development of a composting line for the waste generated on the farm and nearby is proposed. The following materials are considered to be available:
- Solid part of slurry from neighboring pig farm (15 km)
- Manure from 700 sheep (current)
- Manure from 27 cows (current)
- Manure from 6 horses (current)
- Organic matter from the orchard
- Organic waste from the village and villages around potentially
- Pruning remains of almonds, vineyard, and pistachios
- Vegetable leftovers from the market of Topares (village 9 km away)
The vermicomposting section would increase its complexity since effluents from the pig farms must be treated. It will be necessary to develop an operation to treat the liquid fraction of the slurry through a vermifilter, a trickling filter composed of different filter layers and worms, designed by Professor José Tohá in Chile. This information already exists, but its adaptation to the characteristics and infrastructure of the farm should be sought. In principle, the treatment of the solid fraction will go through the composting process and then be fed to the worms as in the previous step transforming it into earthworm humus. We also expect to have some water from the treatment of the liquid fraction that could then be used for irrigation or composting.
Tackling the pollution problem in the area and making a natural compost that nourishes and heals the soil, aspiring to promote a collaborative effort that changes our impact on the environment from harmful to regenerative. This project would require an investment of close to 200,000 euros. It is considered that it could be key in transforming waste from the farm and pig farm nearby for the future and, why not, for all of Spain.
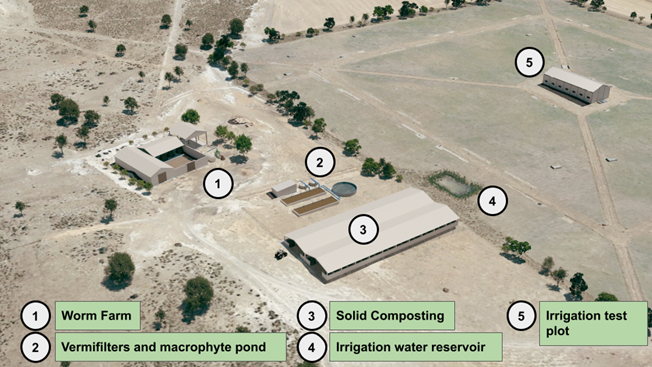
Below is a render of how we have planned the project to look like, remodeling buildings that already exist on the farm. Here, 500 cubic meters of solid pig slurry will be transformed with vermicompost, and 400 cubic meters of the liquid fraction will be cleaned with worm filters. This render was created by Chema Conesa and Alfonso Bernal.
It is concluded that the experiment gives us the certainty that earthworm farming is viable on the farm. The scaling up will depend on the time and resources that can be dedicated to the project. If no resources can be invested in the project, it will still remain a demonstrative area of regenerative practices. It is essential to consider that fertilizing the 1,100 hectares of the farm is one of the opportunities for this project and one of the biggest complexities the owners face.
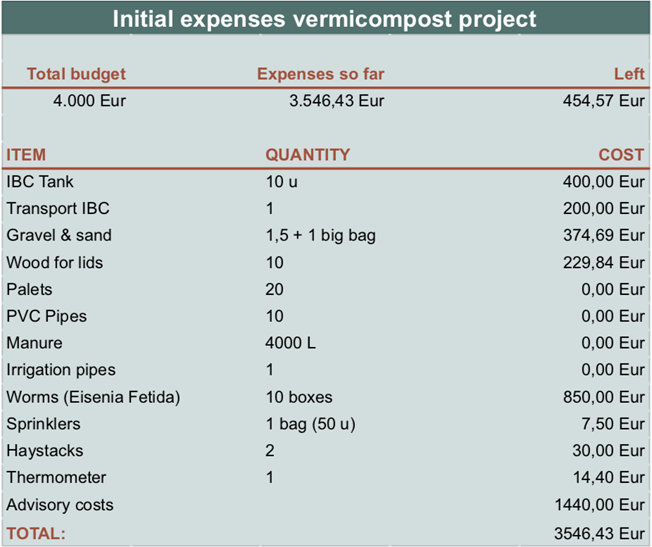
5. Budget of initial set-up
6. Annex, recording of temperature in the IBC tanks
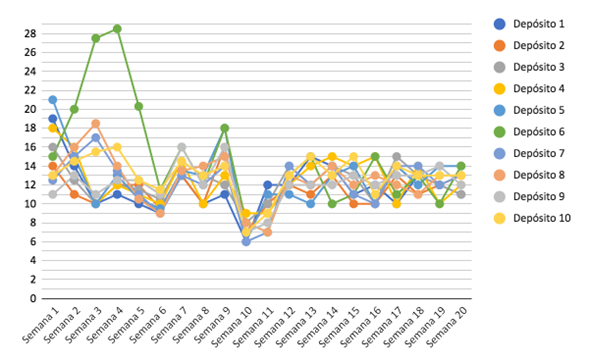
Graph of the temperature inside the IBC tanks during the first 20 weeks. You can observe one of the tanks went into a thermophilic phase in week 2-4, (greenline) and temperatures dropped till 6 °C in most of the tanks in week 10.
7. Reading tips
- The Worm Farmer’s Handbook: Mid- To Large-Scale Vermicomposting for Farms, Businesses, Municipalities, Schools, and Institutions. By Rhonda Sherman
- Teaming with Microbes: A Gardener’s Guide to the Soil Food Web (Teaming #1). By Jeff Lowenfels, Wayne Lewis
- The Rodale Book of Composting, Newly Revised and Updated: Simple Methods to Improve Your Soil, Recycle Waste, Grow Healthier Plants, and Create an Earth-Friendly Garden (Rodale Classics). By Grace Gershuny (Goodreads Author) (Editor), Deborah L. Martin (Editor)
- What is Vermicompost, How to Produce and Apply it