

How do you collect a soil sample for analysis?
Soil sampling 101: For farmers and Agronomists
Soil nutrient availability varies from year to year and from field to field and has a direct impact on crop yield. Soil testing is critical for understanding the amount of fertilizer and other soil amendments needed to achieve optimal crop yield and quality without creating negative environmental impacts. Soil sampling is the first step in the soil testing process and tends to be the largest source of errors.
Soil test results are only as accurate as the soil sample taken! This article will walk you through the steps of proper soil sampling to ensure the sample you send off to the laboratory will give you the most reliable information.
Plan before you sample!
Before you start sampling, make sure you know the soil sampling protocols recommended for your cropping system (depth, timing, etc.) and as much information as possible about your farm. Gather information from soil survey maps or aerial photographs, and use your knowledge of the management history on your farm (e.g., years under cultivation, previous applications of compost or lime, cropping history) to delineate soil sampling areas on your farm.
For those in the United States, the NRCS Web Soil Survey generates soil survey maps and aerial photographs and is available online. This tool will help you correctly interpret your soil samples results and make sound decisions.
It is also important to choose a soil testing lab before you start sampling and know any special requirements they may have for sampling or shipping. Soil testing methods vary between laboratories, so if you want to compare results across years or for different practices on your farm, make sure you use the same soil test lab for comparisons. You want to have confidence in the results you get back, so choose a reputable soil testing service. In the United States, the lab should have some accreditation (ideally NAPR or ALP), so if you do not see that on their website, call them and ask.
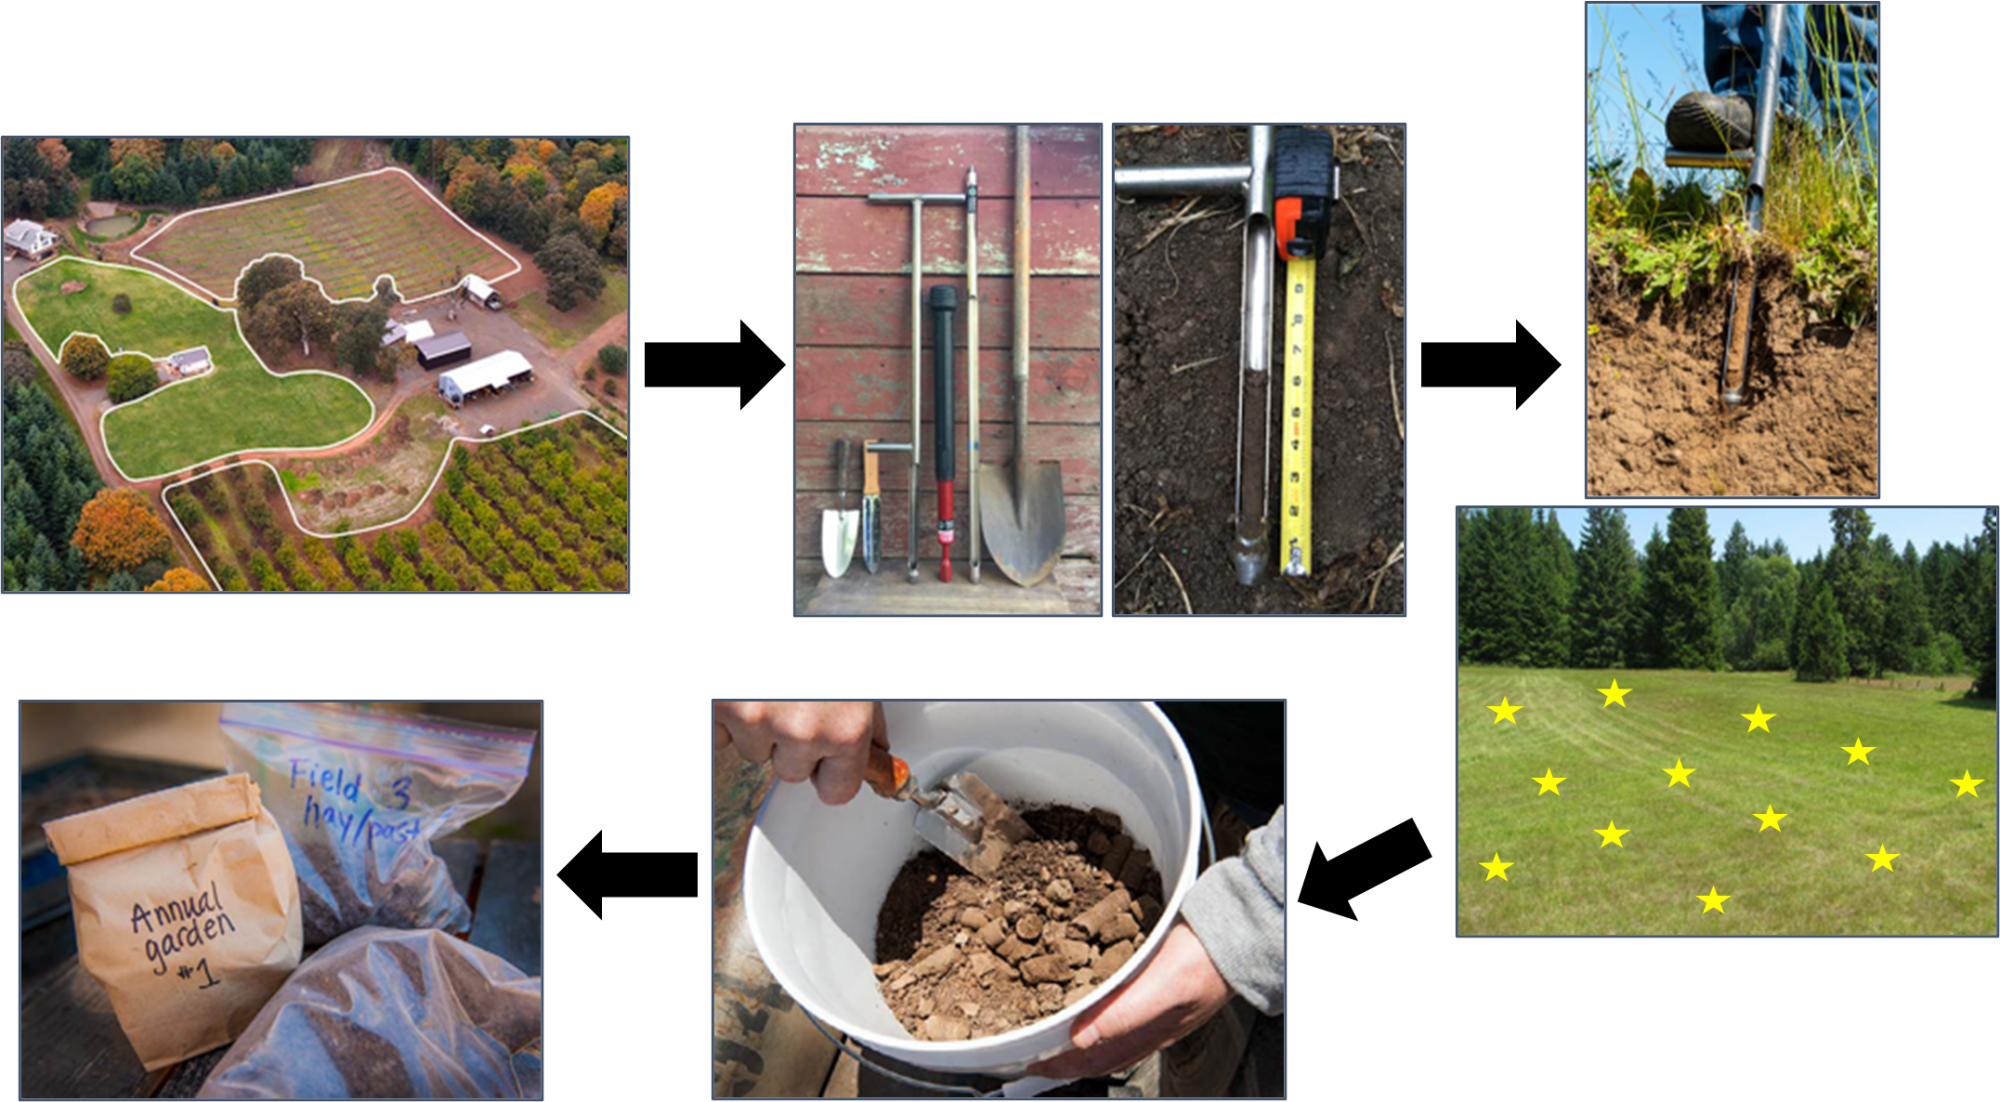
Figure 1. Overview of soil sampling: a) Make a sampling plan based on the farm or field you are sampling; b) Gather the tools you need for sampling and decide on proper sampling depth; c) Take multiple soil samples across a field and ensure proper depth for each sample; d) Mix samples together to create a composite sample; and e) Place soil from mixed sample into a well-labeled bag to send off for analysis (images sourced from OSU Extension Publication EC 628, “A Guide to Collecting Soil Samples for Farms and Gardens”).
1. Knowing the best timing and frequency of soil sampling for analysis
A soil sample is a snapshot in time of the soil nutrient status in the field. Sample at a time that makes sense to use the information for timely management decisions. The exact timing will depend on the cropping system, but soil samples are usually taken prior to fertilization and/or before your plants need the nutrients the most. Keep in mind that amendments with limited mobility in the soil or that take longer to effect change, such as lime or phosphorus fertilizer, will need to be sampled for and applied in the previous season.
Soil nutrient concentrations and pH change naturally across the year. Therefore, choose a time of year to sample and be consistent across years to compare results over time. Sampling frequency can be as often as multiple times per year to monitor environmental nitrogen issues or as infrequent as once every 5 years for orchards. Many vegetable farmers soil test every 2-3 years. Refer to specific crop management publications for sampling frequency guidance.
When NOT to sample: Do not sample right after fertilizer, lime, or manure applications, and not when fields are too wet or covered in snow. Unless you make in-season fertilizer applications, do not take soil samples while crops still take up nutrients.
2. Soil Sampling tools - What will you need to take a soil sample for analysis
Get the right supplies ready for the field: soil sampling device with depth marked out, clean buckets, soil sampling bags, marker/pen, and a notebook to record your samples. Always use clean tools and a clean bucket for sampling. If sampling for iron or zinc, avoid tools made from iron or zinc. Do not use a bucket that has been used to store fertilizer or manure.
The sampling tool will influence the depth you can achieve, the volume of soil you collect, and sample consistency across the field. A soil probe is the preferred tool because it samples the same amount of soil from each depth as it is pushed into the ground (Figure 2). With a shovel, it is hard to get very deep, you end up with a lot of soil, and it is hard to get the same volume from each sample. When using a soil probe:
- Make a clear mark of sampling depth on the soil probe with enamel paint or nail varnish
- Scrape away organic material on the soil surface (mulch, crop residue, fertilizer)
- Push the soil probe straight down into the soil to desired depth, then pull up
- If the soil is very hard, you may need a soil probe with a footstep, or an auger, or a slide hammer (see Figure 1b)
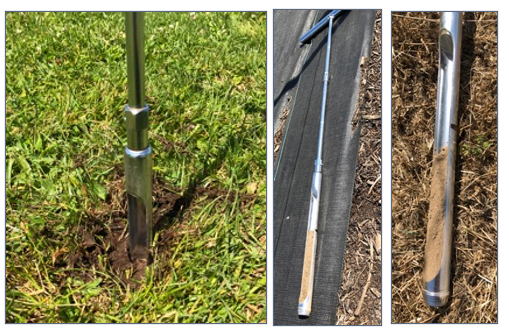
Figure 2. First, scrape the crop away before pushing the soil probe straight into the ground. Mark out the sampling depth with enamel paint.
3. Soil Sampling strategies: Where and how many
Crop, management history, and farm topography will influence where you sample. Be sure to avoid anomalies in the field, like field edges (may have different fertilizer applications), old roads that run through a field (maybe compacted), or animal feeding and watering areas (may have higher nutrient concentrations). If you plan on managing parts of your field differently, then sample them separately. For example, if you have areas that are low-lying and saturated or hillsides that are eroded, you will want to sample those as separate units (Figure 3).

Figure 3. Areas of a farm or field with different management requirements should be sampled separately (image adapted from Mahler and Tindall image in BUL 915).
The most straightforward and common method in annual cropping systems is a whole-field sampling:
- Collect soil cores from 15-30 locations across the field, mix them together, and create a composite sample that represents the whole field
- Sample randomly across the field in a ‘W pattern’ or zigzag across the field
- In general, the larger the field, the more samples you take (i.e., if field <2 hectares, take 15 samples if the field >10 hectares, take 30 samples)
- In any sized field, the more samples you take, the more accurate your data will be
Follow these guidelines to sample orchard crops:
- Divide the field into management units (blocks) based on soil type, management, variety, or the age of orchard species in the field
- Only sample within the wetting zone of the sprinkler (see Figure 4)
- Take soil samples halfway between the trunk and drip line
- Take 15-30 subsamples randomly across the field or block within the wetting zone
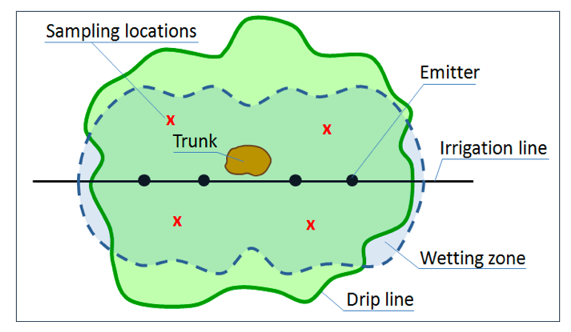
Figure 4. Soil samples (red X) taken within the wetting zone when sampling in an orchard (image From Geisseler, D. and W. Horwath. 2016. Soil Sampling in Orchards. UC Davis Publication).
4. Choosing the sampling depth – is very important!
Nutrient concentrations vary with soil depth, and soil test results from the laboratory are based on sampling depth. It is important to keep a consistent sampling depth within a field and between years and record what depth you sampled. Depth of sampling is usually driven by rooting depth and is therefore cropping system-specific, but it can also depend on the purpose of your sampling.
- If determining prior fertilization needs of a crop, sample to a depth of most root activity (often 15-30cm)
- If sampling soil nitrate, sample at 30cm (United States recommendation)
- If determining liming or nutrient needs in a no-till field, consider using stratified sampling: for example, 0-5cm and 5-15cm
If sampling multiple depths of the soil profile, make sure you have different containers for different depths that are well-marked. You can sample two separate depths with one soil probe (Figure 6).
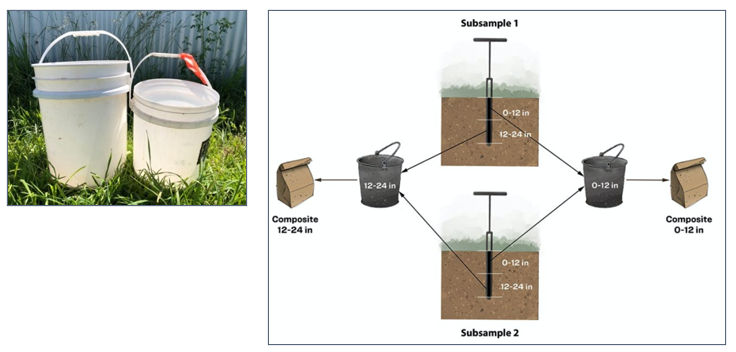
Figure 5. Source: Walsh publication (University of Idaho)
5. Handling and shipping soil samples
As you take each soil subsample, collect them into a clean bucket. Be careful. There are no traces of fertilizer or manure on the probe or bucket. Then follow these steps:
- Break up soil clods with your hands.
- Remove any impurities and debris (plant, sticks, OM from soil surface, rocks).
- Place a well-mixed sample (~ 2 cups) in a sturdy plastic bag or soil sampling bag.
- Carefully label sample bags (date, field ID, depth).
- Record your sample information in a notebook.
Once you have bagged and labeled your samples, they are ready to be shipped. It is preferable to ship samples right away. Otherwise, keep them refrigerated for up to a week or air-dry (not for nitrogen). If testing your soil sample for nitrogen or microbial traits, keep your samples cold and mail them overnight with an ice pack.
Summary points for proper soil sampling
- Reliable soil test data is dependent on soil sampling consistency and accuracy
- Soil sample at a time when you can use the results to make a solid recommendation
- Stay consistent with a sampling time of year, depth, and method to compare across years
- Sampling depth is driven by rooting depth and is cropping system specific
- Plan to collect multiple subsamples across the field for a composite sampling
- Use a clean bucket and proper tools to collect your sample, and follow directions from the laboratory for shipping
References
Geisseler, D. and W. Horwath. 2016. Soil Sampling in Orchards. University of California Davis Publication. http://geisseler.ucdavis.edu/Guidelines/Soil_Sampling_Orchards.pdf
Walsh, O.S., Mahler, R.L. and T.T Tindall. 2020. BUL 915: Soil Testing to Guide Fertilizer Management. University of Idaho Publication. https://www.uidaho.edu/extension/publications/bul/bul915
Fery, M., Choate, J. and E. Murphy. 2022. EC 628: A Guide to Collecting Soil Samples for Farms and Gardens. Oregon State University Extension Publication. https://extension.oregonstate.edu/catalog/pub/ec-628-guide-collecting-soil-samples-farms-gardens