")

How to grow Melons for Profit - Everything you need to know
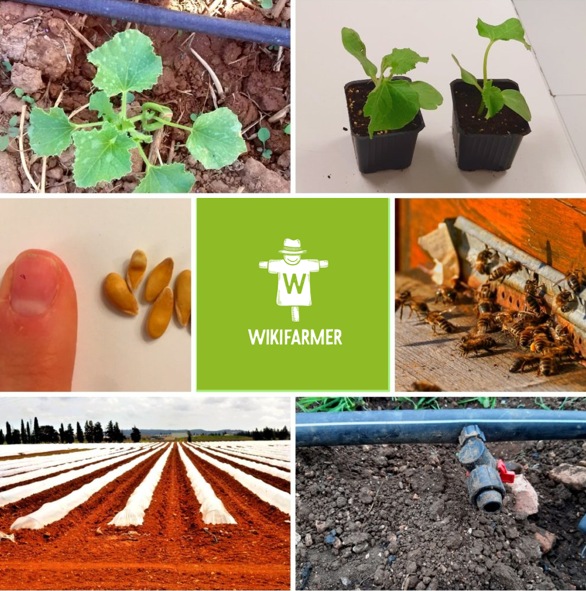
Commercial Melon Farming outdoors –if done rationally and on a scalable basis- can be a good source of income. The restrictive factor when growing muskmelon is always the climate. The plant comes from Africa. It is a plant extremely sensitive to low temperatures and frost. It requires on average temperatures from 18 to 35°C (64 to 95 °F), while soil temperature should not fall below 18°C (64°F). In a few words, most commercial melon growers start the crop from seeds (hybrids) in an indoor protected environment. As they wait for the young seedlings to grow and be ready for transplanting, they prepare the field. They till the land, they make the beds or furrows and they place a black plastic film through the rows. The black plastic film not only helps the soil become warmer but also controls weeds. They also design and place the drip irrigation system. Some producers harden the plants for 3-6 days before transplanting them at their final positions. When they are ready for transplanting, they make small holes in the plastic film, where they dig holes and plant the seedlings. Fertilization, Drip Irrigation and Weed Management is applied in most cases. Thinning is also applied. This means that commercial melon growers remove the malformed or underdeveloped melons in order to encourage the plant to devote its resources in fewer but bigger and tastier fruits. Most commercial melon varieties can be harvested 78-90 days after transplanting. Harvesting can only be made through hand scissors or knives. After harvesting, melon growers plow and destroy the remaining of the crop. They may also rotate the crop, in order to control diseases or prevent soil from depleting. As a general rule, we shall avoid growing Cucurbitaceae in the same soil for more than two consecutive years.
Technically, the word melon refers to any member of the family of Cucurbitaceae, however, most people with the term melon refer specifically to Cucumis melo L.
 First of all, it is crucial to decide the growing method as well as the varieties of muskmelon that thrive in our area. There are 2 methods to grow melons: Growing from seed and growing from seedlings.
Growing Melons From Seed
For growing outdoors, melons need on average 100 to 130 days from seeding to harvesting. However, if you are planning to grow melon from seed, there are some facts you need to know. First, melon seeds require at least 18 °C (64 °F) soil temperature in order to germinate. Second, it is important for the seed to have optimum moisture levels in order to sprout. Over irrigation can be harmful. Some producers water thoroughly the soil a day before direct seeding and do not irrigate again, until the seeds sprout. However, this is not a good technique if the soil has difficulties in preserving enough available water. Many producers normally plant the seeds in hills or raised beds. If they have not applied manure before planting, they dig holes 14 to 16 inches (35-40 cm) deep and wide and add the manure. They mix the manure with the soil removed and create small hills. Next, they plant 3-5 seeds in each hill at a depth of 1 inch (3 cm). It crucial for the soil to have enough humidity at this stage. As for the seeding distances, a commonly used pattern is 90–120 cm (3–4 ft) between seeds in a row and 150–180 cm (5–6 ft) between rows. At the time the seedlings have developed 1-2 true leaves, many producers remove the extra seedlings, leaving 2-3 healthy plants per hill.
In 1 oz. of melon seeds, there are 700-750 melon seeds (in every grammar of melon seeds, there are about 25-30 melon seeds). Many producers report that they need 0,25-0,4 kg of seeds per hectare, or 0,22 to 0,35 lbs. per acre. Melon seeds germinate relatively easily in 4-7 days depending on the weather and soil conditions. In areas with a danger of frost, growers prefer to sow the seeds in nursery under controlled conditions and then transplanting them into their final positions. They prefer to use turf as substrate for optimum aeration. They start their transplants indoors 2-3 weeks before transplanting. Some producers harden the plants for 3-6 days before transplanting them at their final positions.
Growing melons from Non-Grafted Seedlings
Another commonly used method is buying non grafted seedlings. If we follow this method, it is crucial to choose carefully the variety of melon we are going to plant. If -for example- the fields in our area have problems with diseases, pests, low pH or salinity levels, then not all varieties can thrive. Some varieties are tolerant to some of those factors, while others are not. Most producers prefer to buy and transplant seedlings aged from 3-6 weeks. At this point, they have developed 1-3 true leaves.
Growing Μelons from Grafted Seedlings
Grafting is a commonly used technique by which we join together parts from two different plants, so that they will grow as a single plant. The upper part of the first plant is called scion and grows on the root system of the second plant, which is called rootstock. Eventually, we have a plant that combines all the advantages of its different components. Some producers prefer to grow from seed both the rootstock plant and the scion. Then, they perform the grafting by themselves, while others buy certified grafted seedlings from legitimate sellers. Some commonly used seedlings nowadays are hybrids of Cucumis melo L grafted on C. maxima × C. moschata.
Soil Requirements and Preparation for Melon Farming
Melons thrive best in rich, slightly sandy soils with pH levels from 6 to 6,5. They do not like soggy soils. Heavy clay soils with poor drainage and aeration should be avoided. Melon farming requires extensive soil preparation before planting, in order to be profitable and lead to high yields.
The basic soil preparation starts about 3 months before transplanting melon seedlings. Farmers plow well at that time. Plowing improves soil aeration and drainage. At the same time, plowing removes rocks and other undesirable materials from the soil. One week before planting, many farmers apply a pre-planting fertilizer such as manure or synthetic commercial fertilizer, always after consulting a local licensed agronomist. Since melon plants need a lot of space to grow, farmers plant them at predefined distances. Consequently, there is no reason to apply the pre-planting fertilizer to the entire field. A good technique is to mark the areas you are going to plant and then apply the fertilizer towards the lines. The next day is probably the right time to install the drip irrigation pipes. Following the installation, some farmers can apply soil disinfection substances through the irrigation system, in case soil analysis has revealed soil infection problems (ask a licensed agronomist in your area).
The next and most important step (especially in countries with non optimum soil temperature during the planting period) is the linear polyethylene coating. Many producers cover the rows with black or green Infrared- Transmitting (IRT) or black plastic film. They use this technique, in order to maintain the root zone temperature at optimum levels ( >18°C or 64°F) and prevent weeds from growing. In this way, the plant growth is boosted, while weeds are controlled effectively.
Melon Planting, Plant spacing and Number of Plants per Hectare.
In many cases, the most suitable period to plant melons outdoors, is during the second half of spring. At that time, the danger of frost has passed in most cases. Farmers generally prefer plants aged from 3 to 6 weeks. At this point they have developed 1 to 3 true leaves.
After all the preparation steps that started months before planting (plowing, basic fertilization, tillage, installation of the irrigation system and plastic film covering), we can proceed with transplanting. Growers label the exact points on the polyethylene plastic where they will plant the young plants. They then dig holes on the plastic and plant the seedlings. It is important to plant the seedlings at the same depth as they were at the nursery.
As far as the planting distances are concerned, a commonly used pattern for medium sized varieties is 0,4 to 0,6 m (1,3 to 2 feet) distance between plants on the row and 1,5 to 2,2 m (5 to 7.2 feet) distance between rows. This pattern will give us 5000-10000 plants per hectare. (1 hectare = 2,47 acres = 10.000 square meters). The distances and the number of plants depend on the melon variety, environmental conditions and of course the desired melon size that is always dictated by the market.
Melons Low Coverage
Due to the fact that in non tropical countries, even in spring, there is always danger for frost or heavy rain, most producers protect young plants with low tunnels coverage. Right after planting, they create tunnels of 50 cm (1.6 feet) height, using plastic or iron support struts and white plastic covers. In a few words, they create tiny greenhouses so as to maintain the desired microclima and protect the young seedlings from harmful factors (weather and is some cases pests). Approximately 20 - 30 days later (depending on the weather conditions), they start to gradually rip the cover, so as to facilitate pollination.
Pruning in Melon Farming - A controversial method
Some melon producers prefer to prune their plants, while others claim that pruning delays the development and fruit set of the plant. Those who prune their plants, remove most of the peripheral veins of the plant early, during the first stages of development, when it only has 3-4 veins. Pruning has been reported to promote the growth of female flowers and accelerates maturity in some cases. Some producers prefer to remove excess foliage that prevents proper aeration, during the entire growing period. In this way, they protect the plant from humidity favored infections like Powdery Mildew. However, other researchers claim that removing foliage from the melon plant results in less tasty fruits.
Melon Water Requirements and Irrigation Systems
According to Iowa State University, melon water requirements during dry weather, range from 1 to 2 inches (25mm-50mm) of water every 7 to 10 days. Of course, the water requirements can be totally different under different weather and soil conditions. For example, high atmosphere humidity or rainy days may not require irrigation sessions at all. On the other hand, a dry day with very high temperature may require one irrigation session per day.
Many producers in Mediterranean countries prefer to irrigate their melons for 10 minutes, every other day during their first stages. They decrease irrigation sessions to half, as the fruit approaches maturity. Finally, they reduce further the supplied water, and almost stop irrigation during the last stages of maturity. Excess water at these stages will cause the fruit to be watery and tasteless with a characteristic white heart, because of the lower sugars content. However, there is a considerable number of producers who prefer not to decrease the irrigation application during the maturity levels. They do this because the plants continue to set new fruits. In some states of the USA, commercial melon producers provide on average 25mm-50mm (1-2 inches) of water per week. Many producers prefer to irrigate their melons early in the morning in order to minimise risk of foliage diseases.
Generally, muskmelons have high water requirements, but watering the foliage has been linked with diseases outbreaks. Excess humidity in general may favor the development of pathogens such as Powdery Mildew. On the other hand, water-stressed plants are more susceptible to diseases. The most commonly used irrigation system is drip irrigation.
Melon Pollination
Pollen grains produced by melon flowers are relatively heavy and cannot be adequately transferred by wind. Fruit setting relies on the activity of bees and other beneficial insects who distribute pollen. In large commercial melon farms, placing 2-3 strong bee hives per hectare at the time before flowering is almost necessary. We shall avoid using insecticides harmful to bees. If the use of some insecticides cannot be avoided, growers prefer to apply them on specific hours, for example late in the evening (ask a local licensed agronomist).
Melon Fertilizer Requirements
First of all, you have to take into consideration the soil condition of your field through semiannual or annual soil testing, before applying any fertilization or tillage method. No two fields are the same, nor can anyone advise you on fertilization methods without taking into account your soil’s test data, tissue analysis and crop history of your field. However, we will list the most common melon fertilization schemes, used by a considerable number of farmers.
The most commonly used fertilization method is called “fertigation” (fertilization + irrigation). Farmers inject water soluble fertilizers inside the drip irrigation system. In this way, they can provide the nutrients gradually and give the plant the proper time to absorb them. Fertigation generally starts about two to three weeks after transplanting melon seedlings.
Many farmers apply a pre-planting fertilization such as well rotted manure towards the rows one week before planting and start the fertigation by applying a Ca(NO₃)₂ fertilizer about two weeks after transplanting. During the next irrigation sessions, they apply a Nitrogen- Phosphorus- Potassium 12-48-8 fertilizer, enriched with trace elements (micronutrients). In many cases, micronutrients make it easier for plants to overcome any stress conditions caused by transplanting. During the flowering stages, some producers provide their melons with Calcium fertilizers in order to facilitate optimum pollination, although this technique has been questioned. Other farmers report that applying Potassium Nitrate at flowering stage has been found to be beneficial.
When melons start the fruit setting procedure, some melon farmers start applying a Nitrogen- Phosphorus- Potassium 20-20-20 fertilizer. They continue the 20-20-20 until the fruit reaches ⅔ of its final weight. From this point onwards, they start providing melons with KNO3 . At the final maturity stage, they change to Κ₂SO4. At these stages, plants normally have greater needs for Potassium in order to create big, well shaped fruits. Keep in mind that melon plants often suffer from Magnesium deficiencies. In this case, farmers apply Magnesium Sulfate or Magnesium Oxide.
However, these are just common patterns that should not be followed without making your own research. Every field is different and has different needs. Checking the soil nutrients and pH is vital before applying any fertilization method. You can consult your local licensed agronomist.
Melon Harvest and Storage
Most melon varieties reach their full maturity and are ready to be harvested 78 to 90 days after transplanting. When they are ready for harvesting, in most cases we notice a yellow spot on their skin on the surface that is in-touch with the soil. Furthermore, we can observe rind colour changes, increased aroma or an easiness of the fruit to slip from the vein.
Due to the differientations in pollination time, not all melons mature at the same time. Thus, we may have to harvest the same field more than one times. Melons can only be harvested by hand. We must be cautious to cut and not pull the melon. After harvesting, melons are often washed and stored in cool temperature.
Melon Yield per Hectare and Acre
Melon producers report that they can produce 15-50 tons of melons per hectare. According to Iowa State University, in large commercial melon farms of the United States, reported yields varied from 20.000 to 53.000 lbs per acre. (1 hectare = 2,47 acres = 10.000 square meters and 1 ton = 1000 kg = 2.200 lbs.)
The yield depends on the variety of the melon plant, it’s general health during the growing period, the planting distances and the environmental conditions. In commercial melon farms, we may expect to harvest 2 or even 3 full size melons per plant.
Common Melon Pests and Diseases
The first precaution against pests and diseases is always crop rotation. The second is to purchase only certified and disease free seeds and seedlings.
Pests
Aphids
Aphids suck the sap and cause the plant to weaken. Leaves start to curl and shrink. Furthermore, aphids transmit several virus diseases. A good technique is to constantly monitor their population using pheromone traps. If the number is over the tolerable limits, then you can consider to intervene, always after the advice of a local licensed agronomist. There are biological as well as chemical solutions on the market, which of course should always be used under GAP standards and the supervision of a local licensed agronomist
Cucumber beetle
There are 2 types of cucumber beetles that affect melon plants.
1 The striped cucumber beetle, Acalymma vittata,and
2 the spotted cucumber beetle Diabrotica undecimpunctata howardi.
They appear very often in the United States and Southern Canada. The adult beetles chew the foliage, flowers, and the fruit of the melon, causing serious damage. However the damages these beetles cause are not only tissue injuries from chewing. They also transmit a dangerous pathogenic bacterium called Erwinia tracheiphila. This bacterium causes one of the most threatening diseases of melons. It causes bacterial wilt of cucurbits. Furthermore, they transmit squash mosaic virus, which is responsible for the squash mosaic, another major disease of melons and squash.
Flea beetles
Flea beetles (Epitrix spp.) are small insects brown to black coloured that cause problems in many Cucurbitaceae. They dig small holes on the foliage that give a characteristic “gun shot” appearance. Furthermore, in many cases plant growth may be reduced. If we do not control the attack, the extended injuries may cause the death of the plant.
Diseases
Anthracnose
Anthracnose is a disease that causes serious damages mostly on leaves. It is caused by the fungus Colletotrichum lagenarium. Cool and wet weather favors the fungus spores. Dry and hot weather conditions stop the cycle of the disease, which will continue again when weather conditions will be optimal. Symptoms appear primarily on the older leaves, causing brown necrotic spots. We may also observe these damages on stems, flowers and fruits. Anthracnose control begins with proper precautionary measures. These include: weed control and proper distances between plants, along with proper pruning for optimal aeration. The proper nutrient and water levels of the plants can also boost their immunity. Chemical treatment is used only if the problem is severe and always under supervision from a local licensed agronomist.
Alternaria leaf blight
Alternaria leaf blight is a disease caused by a species of the fungus Alternaria such as Alternaria cucumerina. The infection is favoured by high temperatures combined with high humidity levels. Symptoms begin with the observation of characteristic spots on the oldest leaves. These spots will become necrotic lesions on leaves as the disease progresses. During the last stages, the entire leave will eventually die.
Powdery Mildew
Powdery Mildew is caused by many different species of fungi. However Erysiphe cichoracacearum and Podosphaera xanthii appear to be the most common ones. We can actually see a white powdery mildew on the leaves. As the powdery mildew moves through the vessels, leaves tend to become brown and eventually die. We must always disinfect our tools after we have handled an infected plant, in order to prevent the infection from spreading to healthy plants.
Verticillium wilt
Verticillium wilt is a disease caused by the fungus Verticillium dahliae. The pathogen can survive many years in the soil and may affect the plants at any time. Infection is favored by cool or mild weather, which explains why symptoms are usually observed during spring. Verticillium control begins with proper precautionary measures similar to those in Anthracnose. In addition, we shall avoid planting melons in areas where other susceptible crops were grown previously.
Cucumber mosaic
Cucumber mosaic is a disease caused by Cucumber mosaic virus (CMV), usually transmitted by aphids. Symptoms include curling of the foliage. In most cases, the latter has already developed a characteristic yellow mosaic on it. We may also observe smaller leaves than those on healthy plants. Flowers can also be affected. Their petals may turn green and distorted. Management includes the control of aphids population on the field and hygiene measures such as tools disinfection and destroying of infected plants.
*Technically, the word melon refers to any member of the family of Cucurbitaceae, however, most people with the term melon refer specifically to Cucumis melo.
Do you have experience in growing melons? Please share your experience, methods and practices in the comments below. All the content you add will soon be reviewed by our agronomists. Once approved, it will be added to Wikifarmer.com and it will influence positively thousands of new and experienced farmers across the world.
Check out Melon and Watermelon Bulk Prices


